Pages

  • Home
  • Blog
  • Shop Online
  • Catalogues
  • Buy the starter kit
Powered by Blogger.

Social Icons

Handmade by Kim Test March 2021

Pages

  • Home
  • Blog
  • SHOP ONLINE
  • Catalogues
  • Buy the starter kit
  • About Me

Ink.Stamp.Share - October Special Blog Hop!

Saturday, October 10, 2020 Bridgwater, UK


Welcome back to another Ink.Stamp.Share Blog Hop!    

If you have just arrived from Gez Carpenters blog and you are visiting my blog for the first time - hello and welcome! Wasn't her project fabulous?

There is no theme today - you'll find we have all used Stampin' Up! products from the Annual, Beginners or Mini catalogues.


To view all of today's projects, scroll down my post until you find the 'Next' button - simply click this button to be taken to the next blog and then repeat until you end up back here again! 

Alternatively, you can click each name under the Roll Call to check out all of the amazing projects!


I had so much fun creating this Christmas card with Peace and Joy Bundle by Stampin' Up!


I've used non traditional colours Blushing Bride and Merry Merlot and guess what, there is not a bit of bling in sight! Regular followers will know that I love adding shimmer and sparkle to my cards but today, I've held back and kept it simple. 


To create my card I started by creating the background, randomly stamping the individual holly and berry photopolymer stamps from the Peace and Joy stamp set. It's the first time I've paired Blushing Bride and Merry Merlot together and I love it.


I combined several of the sentiment stamps to create my own message 'Sending peace and joy to the world'. 

A little bit of peace and joy is just what we all need after the year we have all had. There's still just under 3 months of 2020 left so make sure you take some time to do what makes you happy and brings you more peace in your life.   


To create my message, I stamped the small words in Merry Merlot and cut them to size with my scissors, leaving a thin border of white space around the image.

I then inked the large word stamps in Blushing Bride and lightly applied Merry Merlot to the stamp using a Sponge Dauber to create an ombre effect - how cool is that?


I used liquid glue to apply my words to a piece of Blushing Bride cardstock and then attached it to my card using Dimensionals, at an angle. 

This card is definitely a contender for our Christmas Card this year. You could mix it up and create in so many different colour ways. I'm thinking Pool Party and Pretty Peacock, Seaside Spray and Misty Moonlight and maybe Crumb Cake and Early Espresso. 


Thank you so much for visiting my blog - I hope you enjoyed my project today! You can sign up to receive my future blog posts by email by clicking here. 

If you have the time, it would be lovely if you could leave us comments to let us know you've stopped by! We all love to receive them ❤


Roll Call


Jo Blackman

Gez Carpenter

Kim Price - you are here

Libby Fens

Karen Egan

Mo Rootes

Cindy Mitchell-Clark

Laura Mackie

Jill Chapman

Annette Elias

Tricia Butts

Lisa Kmiec

Rebecca-Jo Unwin

read more
in Blog Hops, Ink Stamp Share Blog Hop, Peace & Joy Bundle

Stamp 'N Hop October Blog Hop!

Bridgwater, UK


Hello and welcome to the monthly Stamp N’ Blog Hop! 

If you have just arrived from Laura Mackie's blog - isn't her project simply stunning? 

If you're starting here, you can join the hop to see all of today's projects - all you have to do is scroll down this page until you find the 'Next' button. Then click 'Next' to be taken to the next blog and repeat until you end up back here again! 

This month’s theme is 'Favourite DSP'

My favourite patterned paper changes quite often as we are spoilt for so much choice with ranges in both the Annual and Mini Stampin' Up! catalogues.


Right now my favourite patterned paper is the Magic in this Night DSP. I've been using it so much in the run up to Halloween and I can't wait to create non Halloween projects with it too.


I've got 3 more Halloween projects featuring this DSP to share with you between now and 31st October! 


The project I'm sharing today are these super cute Halloween Treat Bags. I created this unique shaped treat bag over 3 years ago now and the original project is still my most popular blog post and most viewed video. Recently someone left a comment on YouTube asking for a larger size - challenge accepted, here it is!

I've filmed a video so you can see exactly how I made them. If you don't have time to watch it now, you could add it to your playlist on YouTube as I promise you, they are such a quick make and you'll find lot's of uses for them as they are suitable for all occasions!


I decided to use the various black patterned paper from the Magic in this Night DSP and pair them with elements created with neon like colours - I've used Magenta Madness, Gorgeous Grape, Granny Apple Green, Poppy Parade and Pumpkin Pie (only seen in the video)


I've also added Black Glittered Organdy Ribbon and Black Glitter Paper to give it a bit of sparkle. 

Are you wondering where I got the matching twine from? Watch my video to find out!


If you want to get everything prepared in advance, you will need a piece of patterned paper measuring 7 1/2" by 7 1/2".

Grab your scoreboard, scissors, bone folder and double-sided tape and note that all measurements are in inches
  • Score at 1 3/4"
  • Turn the paper clockwise once
  • Score at 1 3/4" (to the score line)
  • Score at 3 1/2"
  • Score at 5 1/4 (to the score line)
  • Score at 7"
If you would like to make a smaller version of this Treat Bag, I have another tutorial here.

 
Coming up on my blog, I have a Christmas Treat Bag to show you, slightly larger than this one. So you don't miss it, click here to sign up receive my blog posts by email. 

Thank you so much for visiting my blog - I hope you enjoyed my project today!

If you have the time, it would be lovely if you could leave us comments to let us know you've stopped by! I'd love to know where you are from and your favourite DSP - current or retired.

Next up on the Stamp N' Hop blog hop we have Alison (aka The Inkspirational Crafter) who has created a wonderful project for you. Simply click next to hop from blog to blog to see all of the fabulous projects!

Roll Call

Jenn Charles (USA)
Narelle Fasulo (Australia)
Libby Dyson (Australia)
Laura Mackie (UK)
Kim Price (UK) - you are here!
Alison Carter - The Inkspirational Crafter (UK)
Vickie Kello - Vicks Krafty Kreations (Australia)
Karen Egan - Craftykarendesigns (UK)
Jo Blackman (UK)
Sandra Herzog (AT)
Rochelle Laird-Smith (Australia)
Rebecca-Jo Unwin (Australia)
Gez Carpenter (UK)
Mo Rootes (UK)
Nicole Mahler (US)
Cheryl Taylor (UK)
Annette Elias (NL)
Susan Simpson (UK)
read more
in Blog Hops, Magic in This Night Suite, Stamp N' Hop

International Blog Highlights October!

Monday, October 5, 2020 Bridgwater, UK


Today I am taking part in Kylie Bertucci's International Blog Highlights!

Each month I enter a handmade card I've designed into Kylie Bertucci's International Blog Highlights. It's great to see crafters from all around the world take part. A great source of inspiration!

The theme is 'Thank You' - you can check out all of the thank you cards entered by clicking on the banner below.

If you like my card, please vote for me - you can find more information on how to vote further down this page.


I do love a bit of shimmer and sparkle so I've been playing with Stampin' Up! products and have used a new technique to come up with a pearlescent background with a hint of colour. 

I usually try and stick to a bundle when creating my cards but today I've mixed it up.

I literally painted the colour onto Whisper White cardstock. To do this I mixed some of the Frost White Shimmer Paint with Seaside Spray. 

The Seaside Spray ink refill will soon be available in the UK but I didn't let the fact I didn't have it stop me. I literally pressed my ink pad onto a teflon sheet and then added the Shimmer Paint to it and mixed it with a paintbrush. 
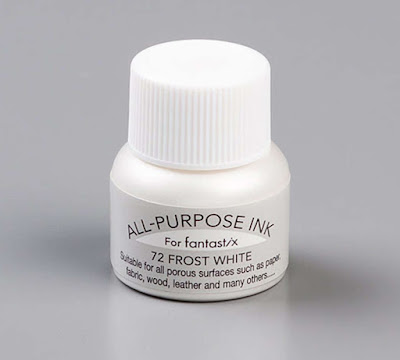

I loved the effect I created but I wanted to take it further so I embossed the painted cardstock when it was fully dry with the Dainty Diamonds Embossing Folder. 

As I always say, it can be difficult to capture in photographs the shimmer in my projects but I think it shows well in my photos. It's so beautiful - although a little extravagant . It certainly wouldn't be cost effective creating lots of these!

Using the Rectangle Stitched dies I die cut two rectangles and positioned these on my card using Dimensionals.

I die cut two leaves from the Forever Flourishing dies and glued them into position. 

I then decided to then apply the White Shimmer Paint lightly over the leaves (although I now wish I did this before I adhered them - however, it was an afterthought ). I love white on white but I felt it needed a little extra something.


I die cut the word 'thanks' from Balmy Blue Glimmer Paper using the Well Written dies. Before I die cut the word, I applied Adhesive Paper to the reverse of the Glimmer Paper to make it quick and easy to adhere my die cut. 

Next I cut a piece of vellum to fit underneath it and layered it onto my card using Mini Dimensionals carefully positioned underneath, so they couldn't be seen.

For the final touch I added two Clear Epoxy Droplets, into the centre of the diamonds. I lightly coloured them with Seaside Spray Blends but the effect is very subtle.

I know lots of people suggest using odd numbers when applying embellishments but I honestly think even numbers are okay when used in this way! I hope you agree?

I hope you have enjoyed looking at my project today! If you like my card I would really appreciate you taking the time to vote.  

To vote, please click the button above then scroll down Kylie's blog post until the gallery of cards appears. 

Make sure you have a good look at all of the cards - to get a better closer look simply click on the card and you will be taken to the creators blog. 

You can make five votes so don't forget to use them all! All you have to do is click the heart in the top right hand corner on each card that you like.

The top ten winners will participate in a Blog Hop before the end of the month.


Thank you for taking the time to visit my blog today! I would love you to leave a comment and say hi

If this is your first visit here and you like what you see, why not subscribe to receive an email every time I publish a blog post - I send out the occasional newsletter too. Click here to subscribe.

read more
in Challenges, Forever Greenery Suite, International Blog Highlights, Peony Garden Suite
new entries old entries
Subscribe to: Posts (Atom)

Hello!

Hello!
Welcome to my papercraft blog Handmade by Kim!


My name is Kim Price and I'm a Stampin' Up! demonstrator from Bridgwater, Somerset in the UK.

Looking for something?

Sign up for papercraft ideas and inspiration!

Popular Posts

  • Masculine Blog Hop!
    Today we are bringing you the Masculine Blog Hop to provide you with papercraft ideas for those ever so hard to craft for men in our life! I...
  • Handmade wedding card as showcased in Kylie Bertucci's Blog Highlight
    If you are visiting my blog for the first time, hi! my name is Kim and I live in the UK. If you live in UK, The Netherlands, Germany, France...
  • Stamp 'N Hop September Blog Hop!
    Welcome to the monthly Stamp N’ Blog Hop!! This is the first time I am joining this blog hop and I'm delighted to be taking part with so...
  • Ink.Stamp.Share Showcase - January Blog Hop!
    Welcome to the Ink.Stamp.Share Showcase Blog Hop!       If you have arrived here from Jo's blog, a very warm welcome to you!  There is n...

Featured

Butterfly Bouquet Blog Hop!

Blog Archive

  • ▼  2021 (87)
    • ▼  November (3)
      • Whimsy & Wonder DSP
      • Artistically Inked Thank You Card
      • Stampin' for Christmas Blog Hop!
    • ►  October (9)
    • ►  September (6)
    • ►  August (6)
    • ►  July (5)
    • ►  June (9)
    • ►  May (7)
    • ►  April (10)
    • ►  March (8)
    • ►  February (10)
    • ►  January (14)
  • ►  2020 (88)
    • ►  December (16)
    • ►  November (13)
    • ►  October (13)
    • ►  September (10)
    • ►  August (10)
    • ►  July (11)
    • ►  June (11)
    • ►  May (4)
  • ►  2017 (12)
    • ►  May (1)
    • ►  April (2)
    • ►  March (2)
    • ►  February (4)
    • ►  January (3)
  • ►  2016 (85)
    • ►  December (6)
    • ►  November (5)
    • ►  October (6)
    • ►  September (9)
    • ►  August (6)
    • ►  July (11)
    • ►  June (3)
    • ►  May (12)
    • ►  April (8)
    • ►  March (5)
    • ►  February (4)
    • ►  January (10)
  • ►  2015 (107)
    • ►  December (4)
    • ►  November (9)
    • ►  October (14)
    • ►  September (17)
    • ►  August (6)
    • ►  July (4)
    • ►  June (5)
    • ►  May (8)
    • ►  April (21)
    • ►  March (5)
    • ►  February (5)
    • ►  January (9)
  • ►  2014 (31)
    • ►  December (2)
    • ►  September (17)
    • ►  August (7)
    • ►  July (4)
    • ►  June (1)

Contact Form

ANNUAL CATALOGUE

MINI CATALOGUE

USEFUL LINKS

  • About me
  • Disclaimer
  • Papercraft creative challenge websites
  • My papercraft creative challenge badges
  • Buy the starter kit
  • Contact me

BEGINNERS CATALOGUE

latest 'grams from @handmadecraftsbykim

© Handmade by Kim Test March 2021.
Theme by Soileilflare.