Pages

  • Home
  • Blog
  • Shop Online
  • Catalogues
  • Buy the starter kit
Powered by Blogger.

Social Icons

Handmade by Kim Test March 2021

Pages

  • Home
  • Blog
  • SHOP ONLINE
  • Catalogues
  • Buy the starter kit
  • About Me

Happy Halloween!

Saturday, October 31, 2020 United Kingdom


Happy Halloween!

It's finally here and so is my last Halloween papercraft project of the year.

This card is inspired by one of my (many) favourite films. I'm a huge TV & Movie fan. I'm a thriller and action girl at heart but I do LOVE the Twilight books and films.

So here is the quote that inspired this card...

"I've considered radioactive spiders and kryptonite....."

This is a famous quote from the first Twilight film. If you google it you will find many references to it. 

Here are some stills from the scene when Bella is trying to work out what it is that makes Edward different. 


In case you are not a Twilight fan or have never heard of it, Bella finds out that Edward is a vampire - a 100 year old vampire, who can run very fast and doesn't eat or sleep. They fall in love and.... well you have to read the books or watch the films to find out!

Now back to the papercraft....


I selected Granny Apple Green to go alongside the Black cardstock base, which I have embossed with the Cobweb Embossing Folder. 

I'll admit, Granny Apple Green is not a favourite of mine but it just works so well for Halloween, I just had to use it.


I really wanted to stamp Granny Apple Green spiders but I don't have the ink pad - so I stamped them in Memento Black ink and coloured the white space with the Granny Apple Green Stampin' Blends! 

Like I did in my first Halloween project of this year, I applied Versamark ink over the whole surface of the spider and then added clear embossing powder, heat setting it for a glossy finish. 


It was so much fun crafting with the Magic in This Night Suite by Stampin' Up! this year

Thank you to my subscribers for sticking with me while I shared my love of Halloween through my papercraft projects. 

Do you have any Halloween plans? Let me know by leaving a comment! 


I'm hoping to watch a TV show called Most Haunted that I've followed from the very beginning - since 2002. It's a Halloween tradition for me, I love watching their ghost hunts!

Most Haunted is mainly on YouTube these days - you can find their channel here. I've seen some pretty crazy stuff happen on live shows over the years but I still live in hope that I will one day see a ghost appear on the screen! 

An overnight stay in a haunted place has been on my bucket list for years - one day I hope to visit one of two places in the south west of England - Shepton Mallet Jail or Bodmin Jail. I've been to the Jamaica Inn but it was during the day and didn't feel that spooky.

Have a great Halloween everyone and stay safe whatever you are doing x

read more
in Halloween, Magic in This Night Suite

Magic in This Night Halloween Treat Box

Friday, October 30, 2020 United Kingdom

Just a quick post from me today in case you need inspiration for a last minute Halloween treat box!

This super cute box is quick and simple to make. I have followed a fab video tutorial by Angie Juda aka Chic' n Scratch, which you can find here.

I've pretty much copied the entire design down to the paper choice and ribbon - everything except the centre piece decoration.


I've used the Magic in This Night Designer Series Paper, Halloween Magic dies, Black Glitter Paper, Layering Circles dies and Black Glittered Organdy Ribbon - all from Stampin' Up! 

Come back tomorrow for my last Halloween project! 

For all of you non Halloween fans, please hang on in there, normal service will resume from Monday! 
read more
in Magic in This Night Suite

Trimming the Town Double Easel Card

Tuesday, October 27, 2020 United Kingdom


I really enjoyed paper piecing with the Trimming the Town Designer Series Paper while creating this double easel card!

I've created the scene to look lovely with the card folded flat and also with the 3D scene.


I die cut trees from one of the patterned sheets to cover up some things that didn't look quite right - like houses or trees that had been chopped in half where I've cut the paper to fit. I even added the 3 people to cover two tree stumps!

I think the trees and the people are perfectly placed to create the illusion of a snowy hilly scene.


I had the same problem with the mountain scene on this card. At the bottom of patterned paper I had houses chopped in half and again, it didn't look right.

I know this part isn't necessarily on display but I still wanted it to look perfect.


So I fussy cut some of the larger houses that I had spare, choosing houses in blue to keep the colours similar. I placed these houses over the areas I wanted to hide and my problem was solved!


This fun fold is really easy to do and there are lots of YouTube tutorials available to learn how to do this. Just search for Double Easel Card.

Creating this scene took a little while plus it really depends on what you've got available! I really enjoyed the process and finding ways to make it work.

The question is, will I be able to give this one away for Christmas or will I have to keep it? Papercrafters will know what I mean....
read more
in Trimming The Town Suite

Ink.Stamp.Share - October Blog Hop!

Saturday, October 24, 2020 United Kingdom

Welcome back to another Ink.Stamp.Share Blog Hop!    

If you have arrived here from Jo Blackmans blog, a very warm welcome to you! Jo creates the most stunning projects. I can't wait to hop round myself and see what everyone has created.

The theme today is Autumn/Fall or Halloween so you'll find lot's of inspiration here for your seasonal papercraft projects.


To view all of today's projects, scroll down this page until you find the 'Next' button - simply click this button to be taken to the next blog and then repeat until you end up back here again! 

Alternatively, you can click each name under the Roll Call to check out all of the amazing projects!


I've really enjoyed crafting for Halloween this year using the Magic in This Night designer series paper. This is the fifth project I've created and I'll be sharing my last one on Halloween which is just one week away!

I love thinking outside of the box and finding alternative uses for Stampin' Up! products - I've created a sparkly border using the Black Glittered Organdy ribbon. 


I chose to use the Blackberry Bliss spider pattern for this card. Whilst I am absolutely petrified of spiders, this paper doesn't frighten me one little bit. It's stunning, so I bought an extra pack of the Magic in This Night patterned paper in the DSP sale.
 

To decorate my card, I die cut the a label from the Halloween Magic dies and embossed it with the Cobweb Embossing Folder. Just like my previous Halloween card, I've picked out the cobweb detail with my Clear Wink of Stella pen - although this time I was a little more heavy handed and the effect is not quite as subtle as I wanted to be.


For the sentiment I die cut the smaller label and stamped 'Open if you dare' from the Hallows Night Magic stamp set in Memento Black ink. 


Using the same stamp set, I stamped two spiders in Blackberry Bliss ink and die cut these with the coordinating dies. I added the spiders to my card using dimensionals to give the card some dimension.


Thank you so much for visiting my blog - I hope you enjoyed my project today! You can sign up to receive my future blog posts by email by clicking here. 

If you have the time, it would be lovely if you could leave us comments to let us know you've stopped by! We all love to receive them ❤


Roll Call

Jo Blackman

Kim Price - you are here

Annette Elias

Rebecca-Jo Unwin

Tracie St-Louis

Alison Carter

Karen Egan

Kirsty Pattrick

Kristie Meeker Wilson

Libby Fens

Susan Simpson

Cindy Mitchell-Clark

Gez Carpenter

Tricia Butts

Jill Chapman

Mo Rootes

Rochelle Laird-Smith

read more
in Blog Hops, Ink Stamp Share Blog Hop, Magic in This Night Suite

Snowflake Splendor

Tuesday, October 20, 2020 United Kingdom

Oh my goodness, the Snowflake Splendor DSP is just so beautiful. It's even more stunning when embossed with the Winter Snow Embossing Folder (which is also from the Snowflake Splendor Suite).

It's fun to emboss patterned paper now and then but not all patterns and folders suit this technique. When it works, it can add some lovely texture to your project. 

In fact, I heard a great tip a little while ago, if you have accidentally crumpled some paper, emboss it! It might save it from ending up in your bin. 


To create my Christmas card, I added my embossed patterned paper onto a Highland Heather card base. I chose to have super thin borders - about 1mm - for a hint of colour but not too much.

I die cut two labels from the Stitched Nested Labels - the larger one from Vellum (which has been given the Wink of Stella touch) and the smaller from Whisper White Thick Cardstock.

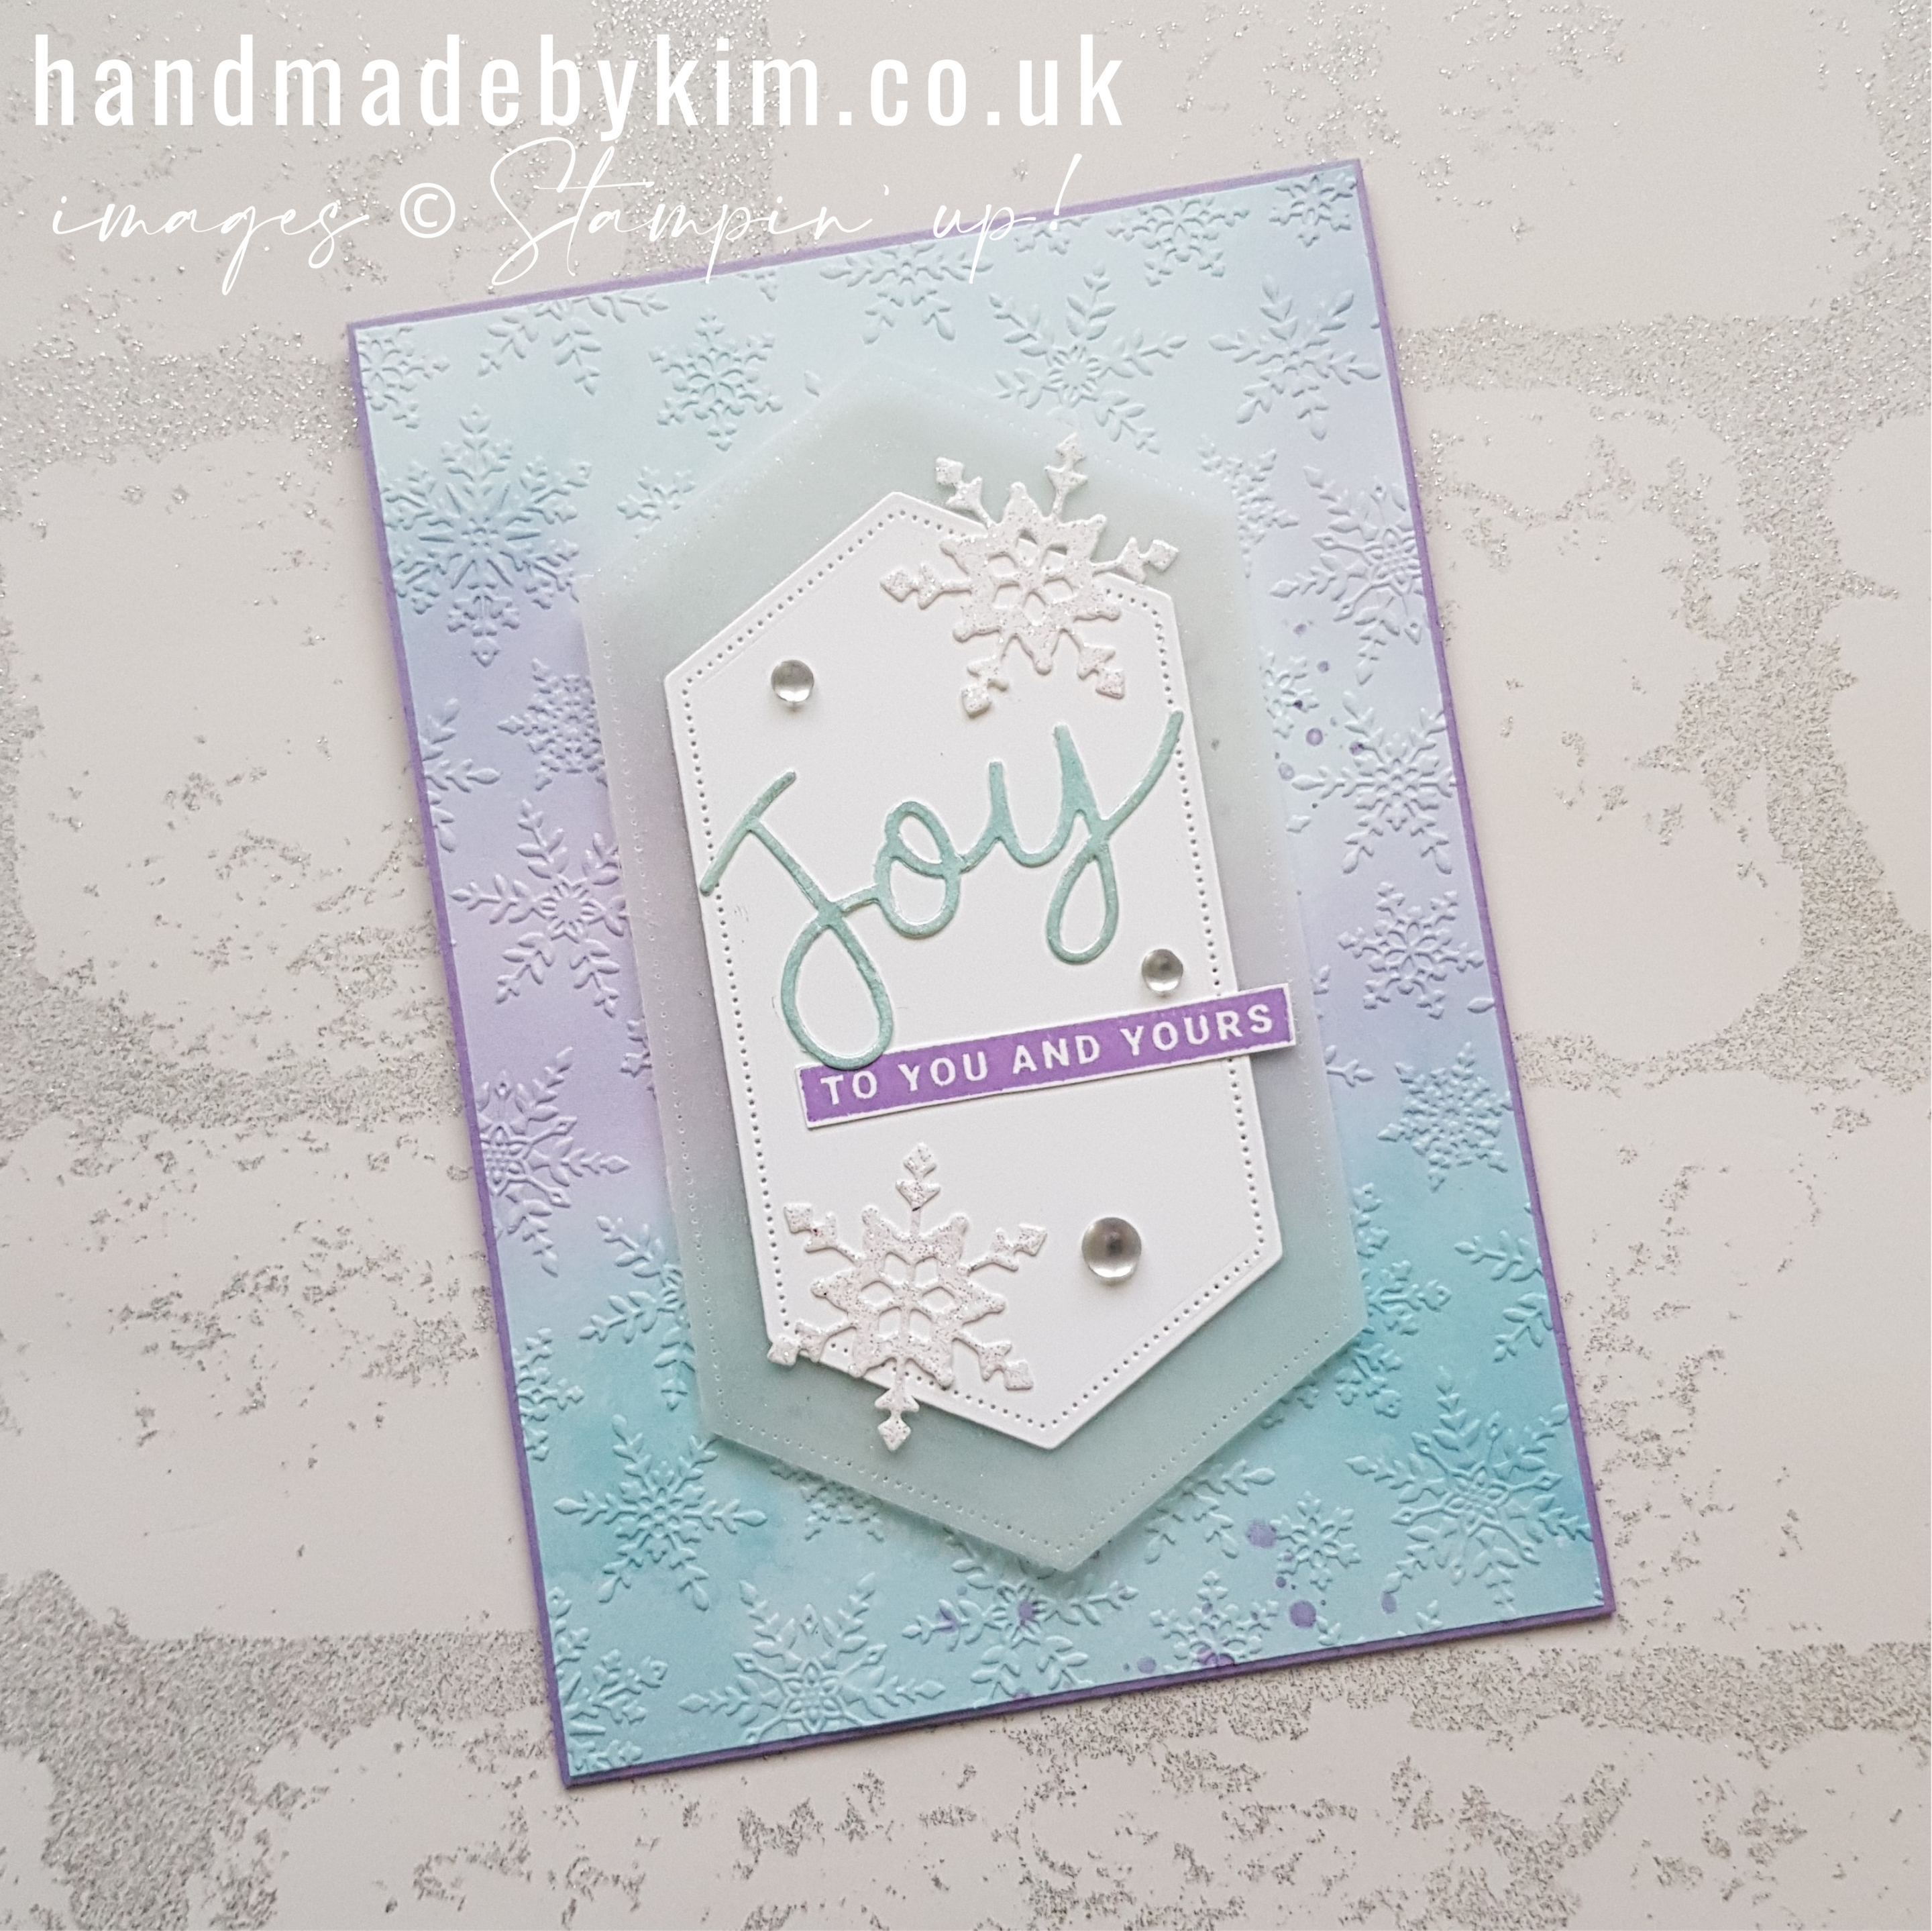
I created the Joy sentiment and snowflakes from some scraps I had left over from other projects.

If you follow my blog, you'll know I've been playing around with Frost White Shimmer Paint (check out my card here), I added some ink to change the colour and literally painted it onto Whisper White cardstock. I had some left over so I die cut the word 'Joy' from the Joy Dies from it.  

I had some snowflakes leftover from another project that were just perfect for this card.

I really wanted sparkly white paper for die cutting snowflakes and I didn't have any, so I spread a thin later of Shimmery White Embossing Paste onto Whisper White cardstock and let it dry before using the So Many Snowflakes dies. 


I stamped 'To you and yours' (from the Joy and Peace stamp set) in Highland Heather ink onto a scrap of Whisper White cardstock and cut it out with scissors.

To finish my card, I added three Frosted Epoxy Droplets. I adore these and my instinct is that I need to hoard them but they are so beautiful I had to share!

Thank you for stopping by today! If you want to be added to my subscriber list to get an email notification when I publish a blog post plus the occasional newsletter - sign up here

read more
in Peace & Joy Bundle, Snowflake Splendor Suite

The Spot - Clean & Simple Fall Challenge #132

Saturday, October 17, 2020 United Kingdom


It's been a little while since I took part in a creative challenge so I visited all of the challenge websites I follow. I saw this Clean and Simple Fall challenge #132 over at The Spot and thought this one would be fun to enter!


I purchased the Love of Leaves bundle from Stampin' Up! a little while ago so this challenge was the ideal opportunity to use this set for the first time.


I decided to use the beautiful Peony Garden DSP and chose patterns which featured the colours Petal Pink and Basic Gray, selecting cardstock to match.


You'll notice that the layers I've created are only marginally smaller than each other. 

I feel the layer of white is very much needed here, it brings everything together - the white in the DSP and the white in the heat embossed sentiment.


Before I assembled my card, I took one of the stitched dies (see bottom left, in the image below) and cut through the coloured cardstock. 

The outline dies create this beautiful stitched effect around the outside of the leaf shaped hole. 


I then used the same die to cut a leaf shape from the Peony Garden patterned paper, using the inner die (see the die in the top right corner in the image above). This created a stitched effect on the surface of the leaf.  

I applied the die cut leaf to the empty space on the cardstock and used dimensionals so it was slightly raised from the surface.


I didn't want to add much more to this card design, so continuing with the clean and simple theme, I added a short but sweet sentiment 'hello'.


Thank you to The Spot for setting this great challenge! 

I am really happy with the simplicity of my design card and I now adore the Stitched Leaves dies (I'm also hoping they will carry over).

Before I go, I have a quick shout out to Anuj, the founder of Feedspot - Feedspot is a content reader where you can read all of your favourite blogs, RSS feeds, YouTube channels and social sites accounts in one place. 

I'm thrilled my website is featured in their Top UK Craft Blogs. I'm currently ranking in at number 29! There are lots of well know brands featured in this list plus many Stampin' Up! demonstrators (and ex demos), including several bloggers that I've admired from afar from a long time.
read more
in #132, Challenges, Love of Leaves Bundle, The Spot

Trimming the Town Blog Hop!

Thursday, October 15, 2020 United Kingdom


Welcome to the Trimming the Town Blog Hop!

If you have arrived from Sara's blog, thank you for visiting Handmade by Kim! Wasn't Sara's project just lovely? 

I'm Kim and I live in Somerset in the UK. You'll find lots of inspiration here today from Stampin' Up! demonstrators and papercrafters from The Netherlands, Australia, Canada, USA and the UK. 


If you've already been hopping along, haven't all the projects been lovely? The Trimming the Town suite of products from Stampin' Up! is great to work with for all papercrafters - whether you're new to card making or not!

You can either buy a) the whole Suite of products, b) the Coming Home stamp set and Home Together dies as a bundle or c) just the patterned paper. 


I've predominately used the Trimming the Town DSP for my project today. I've not done any stamping as everything you see has been taken from the patterned paper. 

I have added Pool Party Sheer ribbon. I've lightly coloured it with my Misty Moonlight blends so the colour matches the cardstock better.


I decided to feature a section from the top of the patterned paper with the snowy town scene and I've made a few alterations - did you notice?


I cut away the daylight sky behind the mountains and replaced it with a snowflake sky at night. This was so easy to do and it works well with my Misty Moonlight cardbase.


I have used the Home Together dies to easily cut out the house and trees from the patterned sheet below on the left - but note this can also be easily achieved by fussy cutting using your scissors. This is exactly what I did for my sentiment which I took from the patterned sheet below on the right.


I hope you've enjoyed my project today! If you have the time I'd love you to leave me a comment to let me know you stopped by.

Next up is Stephanie aka The Crafty Medic and she has a lovely project to show you. Simply click on her name in the list below to visit her blog and then reapeat, working your way down the list and back to the top, until you end up back here!

Come back on Saturday for a set of clean and simple fall cards I've created for a challenge over at The Spot!

read more
in Blog Hops, Crafty Collaborations Blog Hop, Trimming The Town Suite

Stampin' Dreams October Blog Hop!

Bridgwater, UK


Welcome to the Stampin Dreams blog hop!

The theme for today's hop is 'Halloween'. Come and take a look at what myself and Stampin' Up! demonstrators from all over the world have been creating!

]

To view all of the other projects, scroll down this page and find where it says 'You are invited to the Inlinkz link party!' and click the button underneath. Then simply click each photo in the gallery to check out each spooktacular creation!

We do hope you find lots of inspiration here today for your Halloween papercraft projects - to see more of my Halloween themed projects using the Magic in This Night Suite click here


Today I'm featuring another pattern from the fabulous Magic in This Night Designer Series Paper - this damask like design in Pretty Peacock is simply stunning and definitely not just for Halloween. 

I love this patterned paper so much I actually ordered another pack in the DSP sale - this is so I can freely use my first pack, knowing I've got more stashed away!


To decorate my card (and aside from the ribbon) I've only used products in the Magic in This Night suite. Stampin' Up! make coordination so simple and that's why I won't go anywhere else for my papercraft supplies.

I die cut a label from the Halloween Magic dies and then embossed it with the Cobweb 3D embossing folder. I picked out the detail of the web using my clear Wink of Stella pen.


I used the Hallows Magic Night Stamp Set to created the centrepiece using Black Memento Ink and Pretty Peacock ink, die cutting the bats with the coordinating dies.


To complete my card and add a bit more sparkle, I added Black Glittered Organdy Ribbon. 


Thank you so much for taking the time to visit my blog to see what I've created! 

Now it's time to check out the other projects!

But before you go, I'd love to hear from you! Come and say hi by leaving a comment below!

You are invited to the Inlinkz link party!

Click here to enter

read more
in Blog Hops, Magic in This Night Suite, Stampin Dreams Blog Hop
new entries old entries
Subscribe to: Comments (Atom)

Hello!

Hello!
Welcome to my papercraft blog Handmade by Kim!


My name is Kim Price and I'm a Stampin' Up! demonstrator from Bridgwater, Somerset in the UK.

Looking for something?

Sign up for papercraft ideas and inspiration!

Popular Posts

  • Forever blossoms COVID-19 lockdown happy mail!
    Have you heard of happy mail? Quite simply, it's sending something lovely in the mail to bring happiness to the recipient! It's even...
  • Timeless Elegance Series - Beautiful butterfly stationery tin
    So here it is, my brand new shiny series showcasing the gorgeous Timeless Elegance Designer Series Paper from Stampin' Up!. I have 7 dif...

Featured

Butterfly Bouquet Blog Hop!

Blog Archive

  • ►  2021 (87)
    • ►  November (3)
    • ►  October (9)
    • ►  September (6)
    • ►  August (6)
    • ►  July (5)
    • ►  June (9)
    • ►  May (7)
    • ►  April (10)
    • ►  March (8)
    • ►  February (10)
    • ►  January (14)
  • ▼  2020 (88)
    • ►  December (16)
    • ►  November (13)
    • ▼  October (13)
      • Happy Halloween!
      • Magic in This Night Halloween Treat Box
      • Trimming the Town Double Easel Card
      • Ink.Stamp.Share - October Blog Hop!
      • Snowflake Splendor
      • The Spot - Clean & Simple Fall Challenge #132
      • Trimming the Town Blog Hop!
      • Stampin' Dreams October Blog Hop!
      • Ink.Stamp.Share - October Special Blog Hop!
      • Stamp 'N Hop October Blog Hop!
      • International Blog Highlights October!
      • World Card Making Day Blog Hop!
      • Howlin' Halloween Blog Hop
    • ►  September (10)
    • ►  August (10)
    • ►  July (11)
    • ►  June (11)
    • ►  May (4)
  • ►  2017 (12)
    • ►  May (1)
    • ►  April (2)
    • ►  March (2)
    • ►  February (4)
    • ►  January (3)
  • ►  2016 (85)
    • ►  December (6)
    • ►  November (5)
    • ►  October (6)
    • ►  September (9)
    • ►  August (6)
    • ►  July (11)
    • ►  June (3)
    • ►  May (12)
    • ►  April (8)
    • ►  March (5)
    • ►  February (4)
    • ►  January (10)
  • ►  2015 (107)
    • ►  December (4)
    • ►  November (9)
    • ►  October (14)
    • ►  September (17)
    • ►  August (6)
    • ►  July (4)
    • ►  June (5)
    • ►  May (8)
    • ►  April (21)
    • ►  March (5)
    • ►  February (5)
    • ►  January (9)
  • ►  2014 (31)
    • ►  December (2)
    • ►  September (17)
    • ►  August (7)
    • ►  July (4)
    • ►  June (1)

Contact Form

ANNUAL CATALOGUE

MINI CATALOGUE

USEFUL LINKS

  • About me
  • Disclaimer
  • Papercraft creative challenge websites
  • My papercraft creative challenge badges
  • Buy the starter kit
  • Contact me

BEGINNERS CATALOGUE

latest 'grams from @handmadecraftsbykim

© Handmade by Kim Test March 2021.
Theme by Soileilflare.