


I've taken part in the TGIF Challenge today! This week they have a colour challenge to use the Stampin' Up! colours Crumb Cake, Bumble Bee and Night of Navy.
I was completely outside of my comfort zone here but it is great to stretch yourself and work with colour combinations you never normally would combine together! I'm going to try to do this more often!
To view cards entered into this challenge click here.

Another challenge for me right now is I don't have a lot of 'current' Stampin' Up! product to use. The new catalogue was released a few days ago so I am patiently waiting for my box of goodies to arrive... so in the meantime I have a pack of Misty Moonlight cardstock (see this Monday's blog post) and a pack of the Flowers for Every Season 6" x 6" DSP to play with and showcase on my blog!
I have quite a few stamp sets and dies but they are mostly sentiment stamp sets and labels dies! I seem to be quite a collector of these. What this situation has allowed me to do is really look at the individual stamp and dies I've overlooked, so you'll see a few of these over the next few blog posts!

I didn't actually have any Bumble Bee cardstock so I selected one of the patterned paper sheets that featured this colour in the Flowers for Every Season DSP. I really love the subtle monochrome flower design and wish it was available in other colours.
The dies I've used are from in the Garden Gateway Dies. I've actually used the same patterned paper to die cut these shapes from, I really like the multi-tonal look that's been achieved.

The panel of Night of Navy cardstock has been embossed using the Pinewood Plank embossing folder. I stamped 'Thanks' in Versa Mark ink using a sentiment from the Well Said Stamp Set and heat embossed it using white embossing powder. I then broke down the fibres in the Crumb Cake cardstock using my bone folder to give it a worn look. To finish I've added Linen Thread and a Gold Gilded Gem.
Thank you for taking the time to visit my blog. At 10pm BST time on Monday evening I'll be publishing another blog post where I am taking part in a special showcase with demonstrators from all over the world!


Global Design Project - Floral Theme Challenge #243 - Napkin Fold Birthday Card
Tuesday, June 2, 2020 Bridgwater, UK
Have you ever seen a napkin fold card before? They've been around for many years but I've only recently started making cards in this style. They are such fun and a real labour of love.
I am entering this project in the Global Design Project challenge #243. This weeks theme is floral!

To see more papercraft projects with a floral theme click here . Better still, you can enter yourself! The deadline for entries is Saturday 6th June.
There are lots of tutorials on the internet on how to make napkin fold cards. Honestly, they are much easier to make than they look! Why not have a go and use up some of your patterned paper stash!
I am considering making a YouTube video on how to make one using new patterned paper from the forthcoming Annual Catalogue. You can subscribe to my channel by clicking on the YouTube social media icon in the sidebar on the left hand side of my blog.

The combination of the colours Pool Party and Petal Pink in the patterned paper is just so lovely. So I used the same colour cardstock to layer the decoration in the centre of the card.
For the centre piece I used the Layering Oval Dies, adding flowers from the Forever Blossoms stamp set behind it.
For the sentiment I stamped 'Happy' using the Well Said stamp set and added a die cut of the word 'Birthday' using the Well Written Dies. I actually lost the dot for the 'i' in birthday, so I just used a Champagne Rhinestone instead.... genius! (if I can say so myself?)
I added Champagne Rhinestones into the centre of Petal Pink Adhesive Backed Sequins, then placed the sequins in all four corners.

I wrapped Petal Pink Organdy ribbon around the belly band, layering on top of the Pool Party patterned paper.
I die cut circles with the Layering Circle Dies and then used the Forever Blossoms and Itty Bitty Birthday Stamp Set to decorate it, adding some more sequins adorned with rhinestones to finish the look.

The finished card size is 6" by 6" and doesn't fit any standard envelope due to the depth of the card. So I dug out my trusty old Envelope Punch board and made a custom coordinating envelope. Perfect!
I placed a piece of paper in the centre of the envelope front and held it in place with some low tack tape (a sticky note would also suffice).
I inked my Forever Blossoms stamp with memento ink and stamped it over the two corners to get the effect you can see below. Like the flowers featured in the centre of the card and on the belly band, I lightly coloured the flowers and leaves with Pool Party and Mint Macaron Stampin' Blends.
I then removed the piece of paper and drew a line around the space using a Basic Black Stampin' Write Marker and a ruler. A hand drawn line would also look great but I wasn't brave enough to do this.

The napkin fold card was entered into the Pinkies bingo challenge I've mentioned in recent posts into the categories Fancy Fold and Floral or Fauna. The envelope was also entered into Floral or Fauna and the Decorated Envelope category.
I hope you liked my napkin fold card and custom envelope that I've entered into the Global Design Project! I would love to hear from you, leave me a comment to let me know you stopped by!
Also don't forget to check out the gallery of cards featured in this weeks Global Design Project!

Forever Blossom Stamp Set & Cherry Blossom Die Bundle
 |
| Click on the image for more details |
Petal Pink Organdy Ribbon
 |
| Click on the image for more details |
Well Written Dies
 |
| Click on the image for more details |
Itty Bitty Birthdays Stamp Set
 |
| Click on the image for more details |

You can never have too many handbags! Best Dressed with Stampin' Up!
Monday, June 1, 2020 Bridgwater, UK
Anyone who knows me well, knows I LOVE handbags. I also love the colour aubergine, so the handbag on the front row has definitely got my name on it!
The handbags that feature on my card can be found printed on the Best Dressed patterned paper that is retiring from the catalogue in a few days. I cut them out carefully using my paper snips scissors and put them aside while I designed the rest of the card around them.
I chose patterned gingham paper in Purple Posy for the background, to coordinate with the colour of two of the handbags. Then I picked a Smokey Slate card base, with a Whisper White Layer.
I quite often design my cards like this, working backwards from the main feature, making sure everything coordinates!
When I adhered the patterned gingham paper to the Whisper White layer, I didn't add glue to the corners and curled them inwards using my bone folder, hopefully you can see this in these images.
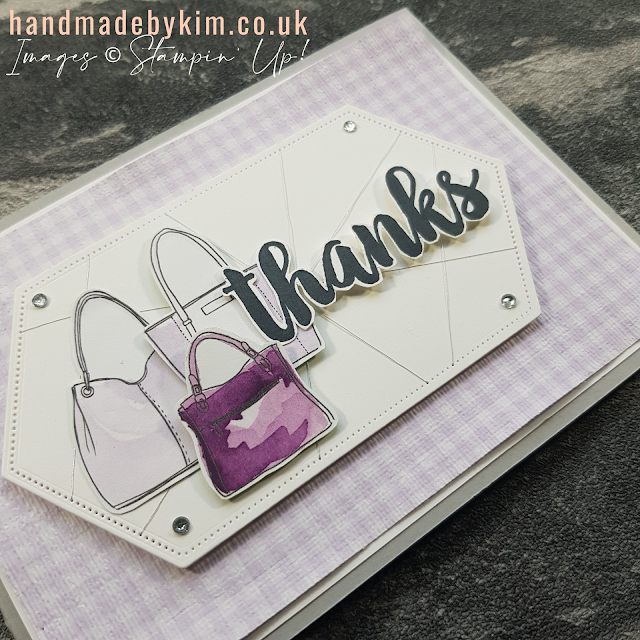
I used the Stitched Nested Labels dies to cut a shape to sit behind the handbags. I picked up my Silver Metallic Thread to wrap around the die cut but then I had an idea! I wondered if the thread would fit through the tiny holes (the die creates to give it a stitched effect)? It did! So just for fun, I created a random pattern using the thread, feeding it through the holes.
This was certainly never my intention, a happy accident maybe! And you know what, I quite liked the finished result!
I added a sentiment to the card, stamping 'thanks' from the Seriously the Best stamp set, using my Stamparatus to get the desired bold result (read more about this in a previous post by clicking here). I cut around the word 'thanks', leaving a thin white border to make it stand out better!
To finish the card, I added some rhinestones. I usually like to add these randomly and in odd numbers however I felt 4 rhinestones placed in these positions looked the best.

With this card, I ticked off two squares on the bingo challenge I've mentioned in my recent posts - 1) embossing and 2) retiring product. If you look closely I embossed the gingham patterned paper with the Subtles embossing folder, twice, in both directions!

Best Dressed Designer Series Paper
 |
| Click on the image for more details |
Seriously the Best Stamp Set
 |
| Click on the image for more details |
Subtles Embossing Folder
 |
| Click on the image for more details |
Subscribe to:
Posts (Atom)


Social Icons