
Showing posts with label Snowflake Splendor Suite. Show all posts
Showing posts with label Snowflake Splendor Suite. Show all posts


It's only three sleeps until Christmas and I still have four more cards to share with you!
I've been so busy the last few weeks getting ready for the festive period that I'm only just now getting round to sharing the final cards I created for 2020.
Your Christmas cards may have been written and posted long ago however, these ideas will always be available here on my blog to help inspire Christmas crafting for many more years to come

I've combined two suites from Stampin' Up! to make this Pop Up Christmas card - I've used the Snowflake Splendor DSP from the Snowflake Splendour suite and the Coming Home stamp set & Home Together dies from the Trimming the Town suite.
I got the inspiration for this card from a fantastic card swap I received from Alexis Pritchard at the #PinkiesRetreat2020. You can check out the front of her card here and the inside here. Alexis kindly shared with me how she created her card - if you're reading this Alexis, thank you!

I used my Stampin' Blends to colour the stamped images - I used Pool Party, Mint Macaron, Smoky Slate and Crumb Cake - these colours go beautifully with the DSP snowflake sky.
The sentiments are from the Itty Bitty Christmas stamp set and Wrapped in Christmas stamp set.

I'd like to wish you and your families a wonderful Christmas.
This year has been like no other. Despite this, the crafting community has continued to flourish with lots of new crafters discovering the joy of creating handmade crafts of many kinds.
For me, there is nothing like the joy I get from creating and without this, I know this year would have been much tougher.
This wonderful hobby has undoubtedly helped so many get through these difficult times and create a positive distraction from the terrible consequences this virus has had on the world and life as we know it.
Thank you to everyone who has visited my blog including my lovely subscribers, I'm so thankful for you taking the time to visit Handmade by Kim. I hope you enjoy my projects and having access to even more ideas when I'm blog hopping with papercrafters from all of the world.
It's been an absolute pleasure reading the comments I receive. These mean more than you could know. It's also been wonderful to see how my projects have inspired projects of your own. Don't forget to mention me on Insta or send me a link to your blog post, it truly makes my day!Please do stay safe throughout the festive season. Some of us may not be able to be with our families this year but thank goodness for the power of technology, making it easier for us to stay connected in different ways.Kim x


Between now and Christmas day I'll be sharing 6 more Christmas card ideas!
I've been so busy the last few weeks getting ready for the festive period that I haven't had as much time to write my blog posts so you could say I'm a little behind....
Your Christmas cards may have been written and posted long ago however, these ideas will always be available here on my blog to help inspire Christmas crafting for many more years to come!

So what to do with all those extra die cuts.... don't throw them away, you never know when you might need them!

The Balmy Blue Glimmer Paper is a favourite of mine and I'll be sad to see it leave Stampin' Up! product offering, so I wanted to feature it once last time.
I've predominately used the So Many Snowflakes dies but I've also used the Stitched Stars dies and Joy dies.

Don't forget to decorate the inside of your card too!

I've thoroughly enjoyed crafting for Christmas this year. It's my favourite time of year to craft and I'll by lying if I said I wasn't going to miss it. The Christmas product range this year has been my most favourite EVER!
I hope you've enjoyed my project! You can subscribe to receive my blog posts by email here.

I'd like to wish you and your families a wonderful Christmas.
This year has been like no other. Despite this, the crafting community has continued to flourish with lots of new crafters discovering the joy of creating handmade crafts of many kinds.
For me, there is nothing like the joy I get from creating and without this, I know this year would have been much tougher.
This wonderful hobby has undoubtedly helped so many get through these difficult times and create a positive distraction from the terrible consequences this virus has had on the world and life as we know it.
Thank you to everyone who has visited my blog including my lovely subscribers, I'm so thankful for you taking the time to visit Handmade by Kim. I hope you enjoy my projects and having access to even more ideas when I'm blog hopping with papercrafters from all of the world.
It's been an absolute pleasure reading the comments I receive. These mean more than you could know. It's also been wonderful to see how my projects have inspired projects of your own. Don't forget to mention me on Insta or send me a link to your blog post, it truly makes my day!Please do stay safe throughout the festive season. Some of us may not be able to be with our families this year but thank goodness for the power of technology, making it easier for us to stay connected in different ways.Kim x


The theme, as always, is 'Thank You' - you can check out all of the thank you cards entered by clicking on the banner below.
If you like my card, please vote for me - you can find more information on how to vote further down this page.

At first glance, you may think I have created a Christmas card, however, these are thank you cards!
I think they are perfect to send to those who have kindly gifted you or your family with a Christmas present, or perhaps just as a thank you during those wintery months.


These thank you cards are the perfect design to mass create.


They are so simple to put together but equally still feel that little bit special due to the silver foil accents and silver embossing.

I've used the stunning Feels Like Frost DSP.
The wintery scenes are so beautiful - I love the bokeh dots in the images.

To get three cards out of one piece of 6"x 6" DSP, I've simply cut the patterned paper into 2" strips and then cut the height down to fit my card base.
I cut strips of silver foil to place either side of the DSP (there is no way I'd cut a piece of foil that large to sit behind the DSP. Thrifty crafters will know exactly what I mean!)

I chose a cardstock base that blended beautifully with the scene.
For the card above I used a Purple Posy and the card below I chose my favourite - that's right you guessed it - Seaside Spray!

I hope you have enjoyed looking at my project today! If you like my card I would really appreciate you taking the time to vote.
To vote, please click the button below then scroll down Kylie's blog post until the gallery of cards appears.
Make sure you have a good look at all of the cards - to get a better closer look simply click on the image of the card and you will be taken to the creators blog.
You can place five votes so don't forget to use them all! All you have to do is click the heart in the top right hand corner on each card that you like.
The top ten winners will participate in a Blog Hop before the end of the month.

Thank you 'snow' much for taking the time to visit my blog today!
If this is your first visit here and you like what you see, why not join my mailing list ? Click here to subscribe to receive notifications when I publish a blog post, you can unsubscribe at any time.
Don't forget to leave a comment and say hi.....


It's my first time hopping along with the Stampin' for Christmas blog hop today!
It doesn't matter if you are starting here or if you have arrived from Alison's blog - I'm thrilled that you have stopped by and wish you all a very warm welcome to my blog - Handmade by Kim
With only 21 days until Christmas, you are in the right place - you'll find lots of inspiration here today for your handmade Christmas projects created by papercrafters and demonstrators with a common love for all things Stampin' Up!.

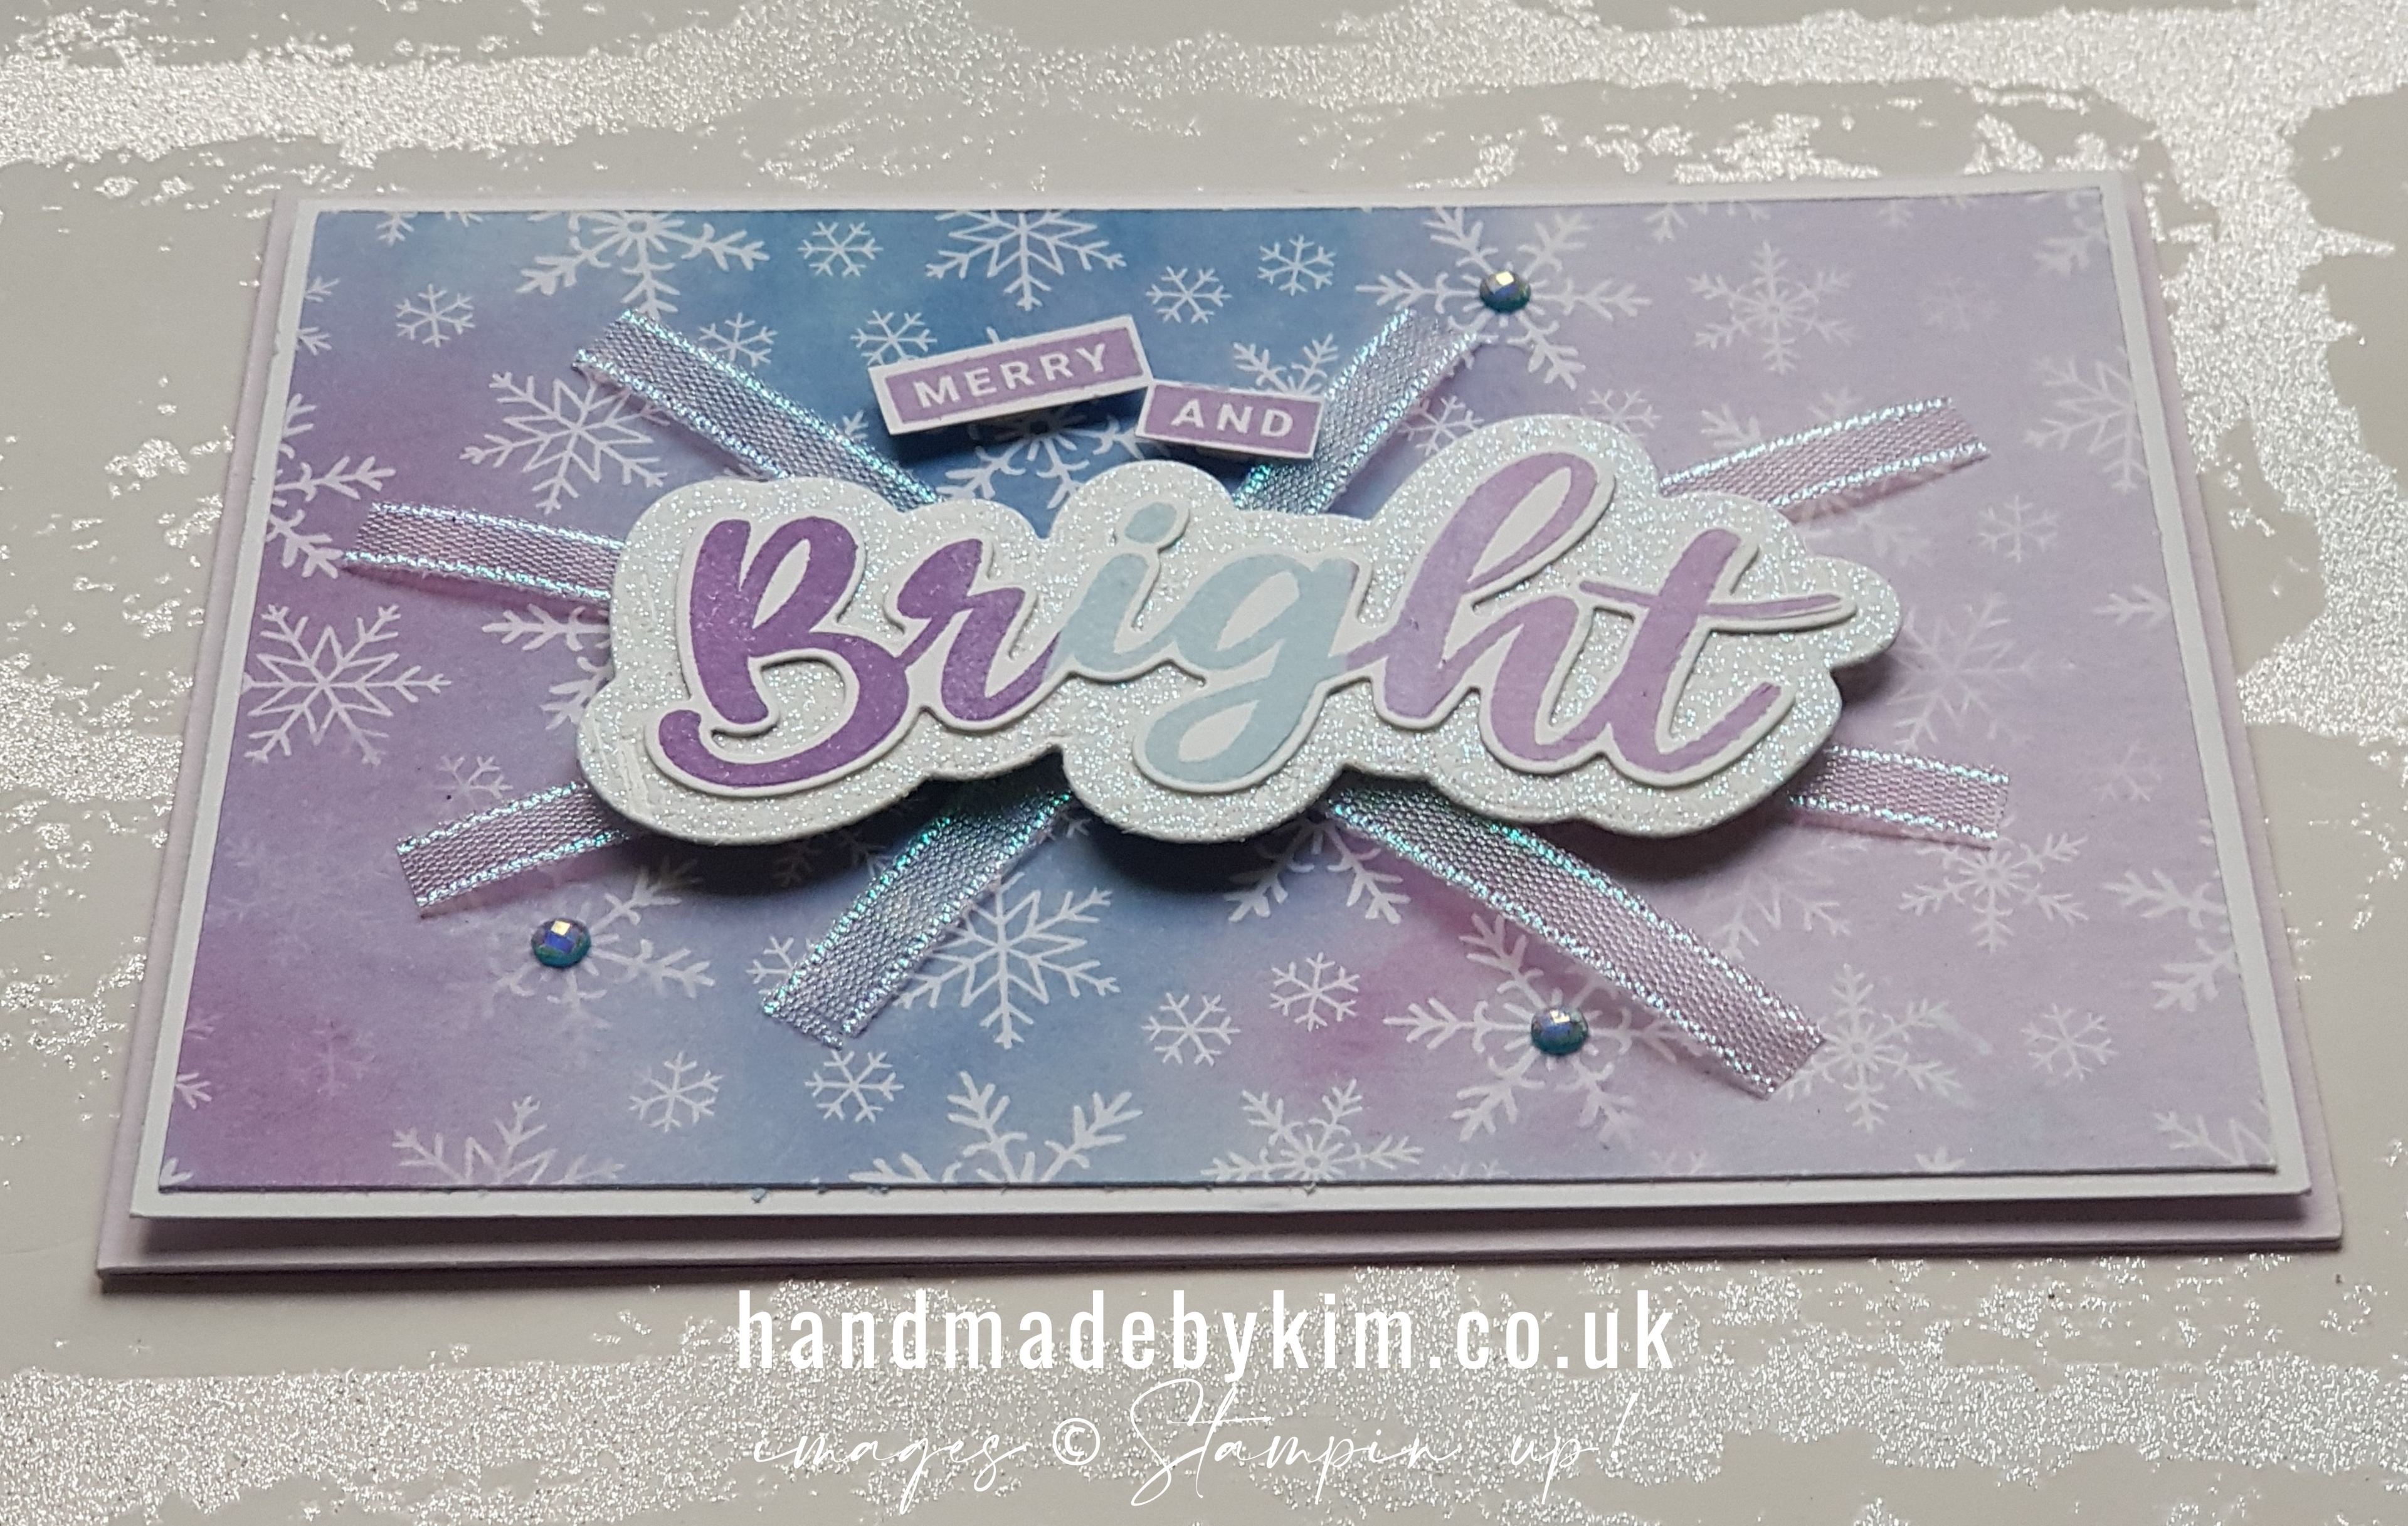
I had loads of fun getting inky with the Peace and Joy stamp set to create this card.
To achieve this three colour stamped image I inked up the stamp directly from the ink pads. I started with the centre colour and then added the outer colours, being careful not to ruin my ink pads!
The colours I have used are Gorgeous Grape, Seaside Spray and Highland Heather.

These colours coordinate really well with the Snowflake Splendor DSP, which I have used for the background.
I've selected a Purple Posy card base with a Whisper White mat to go with the patterned paper.

No, that's not glimmer paper, but it looks like it doesn't it?
I added Shimmery White Embossing Paste to Whisper White cardstock! I let it dry thoroughly before die cutting the shape with the Joy dies.

To embellish my card I applied some Blue Adhesive Backed Gems and then added strips of the Snowflake Splendor Ribbon behind the centre piece.
This ribbon is so beautifully iridescent and looks wonderful with these colours. I'm not very good at being random so in hindsight I think I may have added one too many strips?
I hope you've enjoyed my project today! You can subscribe to receive my blog posts by email here. If you have the time I'd love you to leave me a comment to let me know you stopped by.
Next up is Narelle and she has a wonderful project to show you. Simply click next to hop over to her blog!
Alternatively you can click on the names in the list below to visit everyone's blog. Make sure you work your way down the list to visit all six blogs!

Roll Call
Kim Price - you are here!

Retreat Swaps - Snowflake Splendor Pop Out Gate Fold Tutorial
Monday, November 23, 2020 United Kingdom

Myself and 114 other papercrafters, who are part of Michelle Lasts team of Stampin' Up! demonstrators called the Pinkies gathered together over the weekend at the Pinkies Retreat - virtually!
I was honoured that Michelle had invited me back as a designer and I created 2 make and take projects which I have shared on my Facebook page and Instagram. Fingers crossed they did not disappoint.
You can use the hashtags #PinkiesRetreat2020 and #PinkiesTeam to see pictures shared from this event! You can also check out my Instagram Story under Highlights to see what I posted throughout the weekend.

Today I am sharing with you the second of 3 swaps I created for this event!
I joined three swap groups, each consisting of 5 people plus myself. Each swap group had a clear brief we had to follow, there was a large choice so I decided to go with these.
- Christmas group - a Christmas card
- DSP group - a card with patterned paper as the main focus
- Any Bundle group - a card created using any bundle, typically a stamp set and a die or punch
Naturally, we had to use current Stampin' Up! products!

I made six of each card and kept one for myself.
All three style cards I created are fancy fold Christmas cards and I have filmed a tutorial for each one.
You can find the YouTube video tutorial at the end of this page.

I'll be sharing pictures of the swaps I've received on my Facebook page.
You can join my Facebook page here - just make sure you like my page so you can be notified when I post pictures of all 15 swaps, to see who has designed them and what products they've used!

Today's card is the DSP swap - a Pop Out Gate Fold card featuring the Snowflake Splendor DSP and Snowflake Wishes bundle!


I've selected three DSP patterns that are quite similar and compliment each other!

Watch my tutorial to see how I decorated my card - I demonstrate mutli-colour ombre effect stamping and show you how I created iridescent snowflakes.

In you fancy making a Pop Out Gate Fold card and want to follow my video tutorial, here are the measurements you need to get prepared in advance
Whisper White cardbase:
- 4⅛” x 11”
- Score at 2 ¾”, 8 ¼”
- Flip paper over so that it is is in same orientation but on the other side
- Score at 5 ¼”, 5 ¾”
DSP panels
- Front - 2 ½” x 3 ⅞“ (quantity 2)
- Inside sides - 2 ½” x 3 ⅞“ (quantity 2)
- Inside middle - 2 ¼” x 3 ⅞” (quantity 2)
- Strip for centre - ¼” x 3 ⅞”
Thank you for visiting my blog today, if you decide to give this card a try, do leave me a comment or thumbs up on YouTube to let me know - I hope you enjoy watching my video tutorial!


Hello and welcome to the monthly Stamp N’ Blog Hop!
If you're starting here, come and join the hop! If you have just arrived from Alison's blog, isn't her project fantastic? My name is Kim and I'm so happy you are visiting my blog Handmade by Kim!
To see all of today's projects all you have to do is scroll down this page until you find the 'Next' button. Click 'Next' to be taken to the next blog and repeat until you end up back here again!
This month’s theme is 3D projects. There are over 20 of us on this blog hop today so you'll be spoilt for inspiration for your papercraft projects!

I've created this 3D Christmas Card - I have NO IDEA what this style card is called (leave me a comment if you know!)
In the last few years, I have received at least two cards like this, one from each of my aunties Chiquita and Sherida, who live in Utrecht in The Netherlands.
A week ago I was going through the Christmas cards we received last year (I like to double check my Christmas card list has everyone who sent us a card last year on it!) and I found a card just like this (I forgot to take a photo). I hsve never seen this style card for sale in the UK so the challenge was on, I wanted to create my own version.

I didn't have any circle dies large enough and whilst I'm sure I could have worked this out using various items to draw a pattern onto window sheets, I decided this was a job for my electronic cutting machine!

I designed this shape (yes, it does look like something else lol) in Cricut Design Space using two circles of different sizes (the larger one being 5") and a rectangle. I then welded the shape together so that it would cut as one piece. I added my Window Sheet onto my cutting mat and put the machine to work! The shape was perfect and I have saved it for future use!
I scored the Window Sheet where the rectangle meets the circle and attached it to the underneath of my card with Tear & Tape.
The card base is Mint Macaron cardstock measuring 5" x 10", scored at 5". I've covered the whole inside with a piece of the Snowflake Splendor DSP of the same size.

I've decorated the Window Sheet with die cuts from the So Many Snowflakes dies and Joy dies.
I've used a combination of Whisper White cardstock, Balmy Blue Glimmer Paper - plus Whisper White cardstock which I'd previously painted with Frost White Shimmer paint mixed with Pool Party ink (which was leftover from previous project).
I applied Adhesive Sheets to the back of all the cardstock, before die cutting. This is so all the pieces would stick to the Window Sheet really easily (and be repositionable) and also so it didn't look messy on the reverse side of the Window Sheet. Adhesive Sheets are so much easier to use with die cuts than any other adhesive, especially when working with intricate shapes such as snowflakes.
As you can see the Window Sheet piece folds totally flat. This makes posting easy and if you are in the UK, the bonus is this card would only need a standard stamp.

I've decorated the top of the card with a piece of the same DSP measuring 4 3/4" square. This distracts from the small cut I created, which was needed to be able to insert the top of the Window Sheet into the cardstock, to create the 3D effect.

Thank you so much for visiting my blog - I hope you enjoyed my project today! I really enjoyed creating this.
Like I said at the start, if you know the name of this type of card please let me know in the comments.
Next up on the Stamp N' Hop blog hop we have Stacey Marsh who has created a wonderful project for you. Simply click next to hop from blog to blog to see all of the fabulous projects!

Alternatively you can visit each blog by clicking on the names in the roll call below.
Roll Call
Stacey Marsh (UK)
Jenn Charles (USA)
Narelle Fasulo (Australia)
Libby Dyson (Aus)
Laura Mackie (UK)
Vickie Kello (Aus)
Karen Egan (UK)
Jo Blackman (UK)
Cheryl Taylor (UK)
Gez Carpenter (UK)
Sandra Herzog (AT)
Donna Lester (UK)
Nicole Mahler (US)
Jill Chapman (UK)
Mo Rootes (UK)
Susan Simpson (UK)
Caroline Peck (US)
Sandra Roberts (UK)
Annette Elias (NL)
Alison Carter (UK)
Kim Price (UK) - YOU ARE HERE!
Jenn Charles (USA)
Narelle Fasulo (Australia)
Libby Dyson (Aus)
Laura Mackie (UK)
Vickie Kello (Aus)
Karen Egan (UK)
Jo Blackman (UK)
Cheryl Taylor (UK)
Gez Carpenter (UK)
Sandra Herzog (AT)
Donna Lester (UK)
Nicole Mahler (US)
Jill Chapman (UK)
Mo Rootes (UK)
Susan Simpson (UK)
Caroline Peck (US)
Sandra Roberts (UK)
Annette Elias (NL)
Alison Carter (UK)
Kim Price (UK) - YOU ARE HERE!


Using the Snowflake Wishes stamp set by Stampin' Up!, I've created this set of 4 mini notecards and envelopes, packaged in a decorated acetate box

These 3" x 3" mini notecards are the perfect size to send festive wishes to those people that provide important services such as the newspaper delivery person, milkman, window cleaner or your local delivery driver(s) - especially with all those extra deliveries this year!!

I've only used two colours - Seaside Spray and Misty Moonlight. To achieve these different looks, I've used techniques such as 'stamping off' (also known as second generation stamping), I also used a sponge dauber on the stamp to create multi coloured stamped images.
I was spoilt for choice as there are 11 different snowflake stamps in the Snowflake Wishes stamp set.

I decorated the acetate box with a belly band, which I embossed with the Winter Snow embossing folder. Attached to the belly band are circles die cut using the Layering Circles dies - one stamped using the same techniques as the card, the other, a scalloped circle die cut from Seaside Spray cardstock.
Although they are hard to see in these photographs, there are some Whisper White die cut snowflakes peeking out from under the banner.

All of the banners have been punched out of Seaside Spray cardstock using the Banners Pick a Punch.
The beauty of this punch is that you can create banners of any length you choose with a choice of 3 different widths - 1/2", 3/4", 1" (1.3 cm, 1.9 cm, 2.5 cm). You also get to choose two different style ends making this punch perfect for using with any of the Itty Bitty sentiments stamp sets.

In fact, I've used the Itty Bitty Christmas stamp set for all of these sentiments. This is such a handy stamp set to have in your stash. Since last Christmas, I've pretty much used every stamp!

The sentiments have all been stamped in Versamark and heat embossed with White Embossing Powder and as you can see each banner has been created to perfectly fit the sentiment.

I hope you've enjoyed my project today!
With only 35 days to go until Christmas, I'm busy designing Christmas cards for my friends and family! I'm even contemplating putting our Christmas decorations up a week or two early.
Coming up soon on my blog I have something a little bit different to my usual papercraft projects for you. A quick and simple edible Christmas gift.
Subscribe to:
Posts (Atom)


Social Icons