
Showing posts with label Christmas Card. Show all posts
Showing posts with label Christmas Card. Show all posts

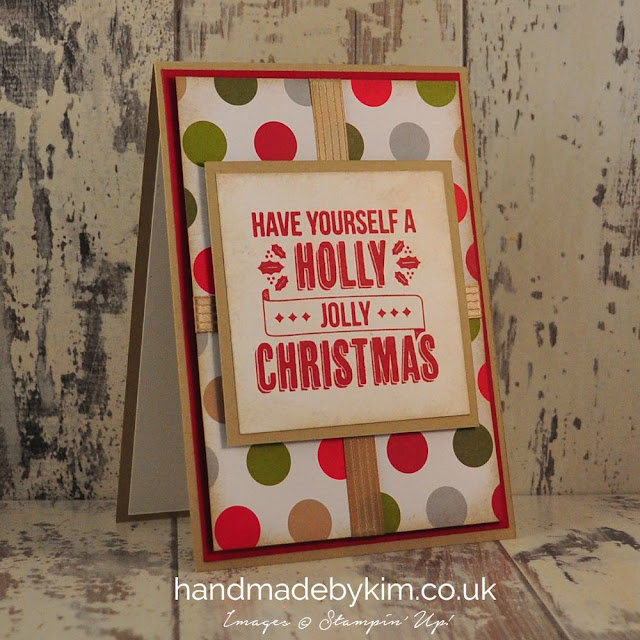
Slider Christmas Cards featuring the Home for Christmas DSP & Cozy Christmas stamp set by Stampin' Up!
Saturday, November 28, 2015

Today's project are two slider cards made using the Home for Christmas DSP & Cozy Christmas stamp set.
The card doesn't opening like a traditional card, instead you pull the ribbon at the top and your card slides out!
To make the card I went back and re-watched a video by Dawn from Dawn's Stamping thoughts - click here to watch the tutorial.

I've made 2 versions, this one features the Christmas Tree pattern from the Home for Christmas DSP and Real Red cardstock.

For this version I have used Pool Party cardstock and the Santa patterned paper. Isn't it really cute? I know exactly who I will be sending this one to.

I've still not had much time in the craft room but I have a few more Christmas projects ready to show you in the next week or two!
Enjoy the rest of your weekend. Bye for now!


Winter Wonderland Christmas Shaker Card using Happy Hearth Thinlit Dies by Stampin' Up! - part 2
Thursday, November 26, 2015

Well I've been working flat out for 4 days helping my Dad and my Husband lay laminate flooring in our living room and dining room. Its been challenging, frustrating and eventful but the end result is just fabulous and it was certainly worth all the hard work, aches and pains.
It was quite funny actually, my card making skills really came into play over these few days. To name a few, I was able to contribute with the measuring, resolving problems and patching up mistakes!
Having mastered laying underlay I was quite disappointed to find that sawing was a skill that I would never get the hang of.
Also, after laying all the flooring trim, I have discovered that No More Nails is not my friend. I really wish they could make Tombow for DIY as I have total control of that adhesive and very little with the No More Nails!

Anyway, enough about me, on Saturday I promised to post my other version of the Winter Wonderland Christmas Shaker Card on Wednesday but unfortunately time completely slipped away from me - please accept my apologies!
So without further ado, here is my second version of the Winter Wonderland Christmas Shaker Card.
I have used Gold Foil instead of Silver Foil and I also used the very cool, on trend antlers print from the Winter Wonderland Specialty DSP. Its so striking, I would love wrapping paper in this design!

If you didn't catch my other card I made using the same sketch and window scene, please click here to take a look at the other version where I've used Blackberry Bliss cardstock instead of Basic Black.

Can you believe its a month until Christmas? If you've got an order to place, please let me know ASAP so we can get the order placed and delivered by Christmas for you. I hope you enjoyed this project today and I hope to hear from you soon.

Winter Wonderland Christmas Shaker Card using Happy Hearth Thinlit Dies by Stampin' Up! - part 1
Saturday, November 21, 2015

I really like the Hearth and Home Thinlit Dies and wanted to make another Christmas Card using the window die. I was also thinking about making a shaker card for the first time. I couldn't decide which to make first so I thought I would have a go combining the two designs together. I love the result. What do you think?

I attached a piece of Window Sheet to the back of the die cut window. I then had a look through my stash of adhesives and managed to find some old foam tape. I added two layers of the foam tape (to give it enough depth) around the edge of the window and then put some sequins inside. I then attached a piece of Whisper White cardstock which I had stamped with the trees background from the Happy Scenes stamp set to the back, before adhering it to my card base.

I love this effect so I recreated it with some different patterned DSP and cardstock. Come back on Wednesday to see the other version I've created.
Thanks for stopping by. I've got some Autumn/Winter catalogues left, if you would like me to post one to you please get in touch using the social media icons on the right hand side.


Today's card showcases the Home For Christmas DSP, cardstock pack and the Cozy Christmas stamp set. All 3 coordinate together perfectly. I just LOVE how easy Stampin' Up! make it for us to coordinate our handmade makes with matching stamps, DSP, cardstock, ribbon and embellishments.
The coordinating product range is one of the main reasons I signed up as a demonstrator, almost two years ago now. That as well as the amazing discount, access to exclusive sneek peeks of new products and pre-orders, and the opportunity to attend events. Little did I know that I would make some really good friends that also share a passion for all things handmade.
Lots of friends and fellow demonstrators are currently over in Belgium at a Stampin' Up! event. Unfortunatley I wasn't able to go due to commitments at work and a severe lack of annual leave remaining. I can't tell you have envious I am but I cannot wait to hear all about it in the coming weeks.

To cut the centrepieces for these cards, I used the Ovals Collection Framelit Dies (for the card in the picture above) and the 2 1/2" and 2" Circle Punches (for the card in the picture below). Real Red and Mint Macaroon ink and cardstock matched perfectly with the DSP.

All of the stamps used are from the Cozy Christmas stamp set, as you can see in the image below, this set also includes a stamp of one of the little houses you can see in the DSP. I LOVE it! Some of these stamps are also going to be perfect for making tags for Christmas presents. I can't wait to get back into my craft room to give this a go. Unfortunatley that may not be until next week now as tomorrow is the first of two weekends where we will be working on decorating our living room and dining room. I can't say I am looking forward to it as its going to be hard work, but I can't wait to see the end results.
While writing this post, I've heard about the awful news in Paris. My thoughts are with the people of Paris and family and friends of all of those people affected.


I've taken inspiration for today's card from a card that my upline Michelle Last created and used as one of the make and take projects at the Pinkies quarterly training last month.
I absolutely loved Michelle's design however I wanted to recreate it using my favourite colours and a few small changes. I've seen lots of cards on Pinterest with purple sky as a background so I incorporated this into my design.
I used a Blackberry Bliss base, a layer of Smoky Slate and added Whisper White cardstock embossed using the Brick Wall Textured Impressions Embossing Folder. I created the purple sky using Wisteria Wonder, Rich Razzleberry, Perfect Plum & Blackberry Bliss. The Stampin' Up! Sponges are perfect for creating a blended look. I stamped the Trees from the Happy Scenes Photopolymer stamp set onto Shimmery White Cardstock - I love how you can just see the sparkle coming through!

I wanted to use a different embossing folder for my next card so I embossed some Kraft cardstock using the Woodgrain Textured Impressions Embossing Folder. I added this onto a layer of Shimmery White cardstock, on a Basic Gray base. I used Shimmery White cardstock again to stamp the trees onto and used Soft Sky, Marina Mist, Lost Lagoon and Night of Navy to create the sky effect. Again, you can see the sparkle coming through from the Shimmery White cardstock. Its almost like teeny tiny snowflakes.

Here is the card I got the inspiration from, that I made at quarterly training, you can also see it on Michelle's blog by clicking here. The Crumb Cake cardstock looks great embossed with the Brick Wall Textured Impressions Embossing Folder and sponged with Crumb Cake ink. I love how Michelle used Vellum to soften the scene behind and used the Santa Sleigh, die cut from the Sleigh Ride Edgelit Dies underneath the Vellum and on top of the tree scene.

Happy Wonderful Christmas - an alternative way of using the Wondrous Wreath Stamp Set
Wednesday, October 28, 2015

I love that last years Christmas set Wondrous Wreath Photopolymer stamp set and the Wonderful Wreath Framelit Dies have carried over to this years Autumn/Winter catalogue.
I was thinking about recreating last years Christmas card because I didn't get a chance to blog about it..... but before I knew it I got totally sidetracked thinking about how else could I use this set without using the main wreath stamp.

The result is that I've made a card using the berries stamp (top right in the picture above) from the Wondrous Wrearh set. I used the sentiment included in this stamp set 'Happy Wonderful Christmas' and then punched out 5 flowers from Vellum cardstock using the Itty Bitty Accents punches and then added some Rhinestones.
I really like this effect. You could definitely use this stamp for any occasion, not just for Christmas. It also gave me another reason to use my current favourite cardstock - Whisper White Thick Cardstock.


If you've been following my blog for a while, you may have noticed that I've been making cards with simple designs recently, I am loving the less is more look but I am not sure, with this card, if it works?
I love simplicity and modern design so I personally like what I've created here but I would love to know what you think.
I've simply cut a piece of the Winter Wonderland 6"x6" Designer Series Paper into 4 and stuck it onto a card base of Whisper White Thick Cardstock using some of the Winter Wonderland Designer Washi Tape. I then die cut "Merry" and stamped "Christmas" using the Holly Jolly Christmas bundle and voila, you have a modern, minimalist Christmas card.
Does it work? Well it does for me.... BUT I would love to know your opinion. Would you like to receive this card? Is it too simple? If you could add anything else to the design of this card, what would it be?
You can leave a comment by scrolling down this page just a little bit and clicking on the link which starts with "Thank you for visiting my website..."


Pinkies Stampin' Up! 2015 Autumn Winter Catalogue Blog Hop! feat. the Jingle All The Way Stamp Set & Sleigh Ride Edgelits Dies
Saturday, September 5, 2015

Thank you for joining us on another Pinkies Blog Hop! We're showcasing lots of gorgeous projects using products from the new Stampin' Up!® Autumn/Winter Seasonal Catalogue. Simply use the buttons at the end of each post to keep hopping!
If you have arrived from Jenni's blog, welcome! Make sure you keep hopping round the blogs to see all of the fabulous projects and don't forget to leave a comment!


I really love this card (okay, so you might have guessed that I'm not a fan of crafting with traditional Christmas colours) however I did wonder what it would look like with a different colour range, with white being the more prominent colour.

To achieve the same look I used the gold diagonal striped paper from the Neutrals Colour Collection DSP and the Gold Snowflake vellum from the Winter Wonderland Designer Vellum Stack (with Whisper White cardstock underneath). I then die cut the reindeer scene and stamped Jingle All The Way underneath.

I hope you liked the cards I've featured today showcasing the awesome Jingle All The Way Bundle from the new Stampin' Up! Autumn Winter Catalogue. Included in the bundle is the Jingle All the Way Clear Mount Stamp Set and the Sleigh Ride Edgelits Dies - don't forget that when you buy a bundle you save an amazing 15%!
Make sure you subscribe to my blog to see more Halloween & Christmas projects plus a series featuring the Timeless Elegance DSP, which is starting on Wednesday 9th September.
The next blog is Michelle's and she has made a fabulous project for you. Happy blog hopping!



With only 122 days until Christmas, its very likely that most crafters will have started to plan their Christmas cards by now.
I know its only August and its still summer but there's nothing wrong with getting out the Christmas stamps and papers. Just don't tell those scrooges out there, you know who they are.
On 1st September the new Stampin Up! Autumn/Winter Catalogue launches. You will find lots of seasonal inspiration and new products in there including the stamp set I have used for this card called Jolly Christmas and the new Designer Series 6x6 Paper Stack called Merry Moments.

You can purchase the products I've used to make this card when the new catalogue launches on 1st September. In the meantime, click here to subscribe to my blog to keep viewing sneek peaks of new products from the Autumn/Winter catalogue and also to be one of the first to be able to download it.

Pinkies Stampin' Up! 2014 Autumn Winter Catalogue Blog Hop! feat. Endless Wishes Stamp Set & Tree Punch
Saturday, September 6, 2014

Thank you for joining us on another Pinkies Blog Hop! We're showcasing lots of gorgeous projects using products from the new Stampin' Up!® Autumn/Winter Seasonal Catalogue. Simply use the buttons at the end of each post to keep hopping!
If you have arrived here from Jenny's blog, welcome!! I really hope you enjoy looking at the projects we have made!
With only 110 days until Christmas, I am busy designing and making my Christmas Cards for friends, colleagues and family! I have roughly 80-100 to make so its important that I can make these fairly quickly and still ensure they still look fabulously festive and on trend.
I love a bit of sparkle at Christmas, in fact my house is usually covered in sparkly decorations! I knew straight away that I wanted to use the glimmer paper within my design but wasn't sure how.
After a few attempts, I settled on this design. Essentially, all you need to do is punch out a hole using the new Tree Punch from a piece of cardstock slightly smaller than your card or gift box base. You then adhere your piece of glimmer paper (or patterned paper) behind it and mount it on your base use Stampin Dimensionals - simple!
The versions of this card below use Night of Navy Cardstock and Silver Glimmer Paper and Island Indigo Cardstock and Gold Glimmer Paper - I can see myself also making this design with Blackberry Bliss, Chocolate Chip & Basic Black.

The Tree Punch is really versatile and with a matching Photopolymer Stamp Set called Festival of Trees, the possibilities are endless. I am looking forward to creating a few designs with this new stamp set, so keep an eye out for these on my blog!
For the sentiment, I have used the new Endless Wishes Photopolymer Stamp Set. There are lot of different combinations to choose from and I just love the effect of mixing up two fonts together!
I thought it would be nice to make a matching gift box and I think these are perfect to give to neighbours or work colleagues as Christmas gifts. To finish off the gift box, I have tied some Silver and Gold 1/8 Ribbon around the box. Please excuse my bows, that is a skill still in progress!
These gift boxes are filled with lots of yummy chocolates and caramels - there is a slim possibility that they will still contain these sweet treats in 3 months time. My husband, I am sure, will find them!

I wanted to show you how versatile this design is by using different colour combinations and here is my first example.
I have used Cherry Cobbler and Old Olive and the new Trim The Tree Designer Series Paper Stack. This design is a modern twist on traditional Christmas colours. You could perhaps add a button or star to the tree, but I simply like it as it is.

This final design uses colours you wouldn't normally associate with Christmas. I have used Basic Grey & Pool Party and the coordinating Designer Series Paper Stacks (Neutrals & Subtles). I think the muted colours alongside the patterned paper look really trendy but it really depends on your taste.

I would love for you to leave a comment on which colour set you prefer?
Dark & Glittery
Bright & Traditional
Muted & Modern
Over the next few months I will continue to showcase more of my festive designs and will also be selecting random subscribers and commenters to receive a few of my projects.
Don't forget that you can subscribe to my blog so you don't miss out!
I hope you've enjoyed looking at my projects, press next to head over to Nicole's blog to see what fabulous project she has created!


Main Supplies Used

Endless Wishes Photopolymer Stamp Set
£13.95

Tree Punch
£15.50
Dark & Glittery


Bright & Traditional


Muted & Modern


Subscribe to:
Posts (Atom)


Social Icons