
Showing posts with label Vellum. Show all posts
Showing posts with label Vellum. Show all posts

International Project Highlights Visual Blog Hop and sketch challenge entry into #GDP058
Wednesday, October 19, 2016


My name is Kim and I live in Somerset in the UK and I have made this birthday card using a sketch by Teneale Williams.
I've used the Blooms and Bliss designer series paper and the lillies from the Remarkable You stamp set.

I have stamped Happy Birthday in Sweet Sugarplum ink using the Stylized Birthday stamp for the inside of the card and also added an edge of torn designer series paper to the top and bottom of the Whisper White layer.

For the front of the card I have added a layer of designer series paper to fit the entire front of the card. I usually leave a border but I really like how this has come out. I then added a small layer of Sweet Sugarplum cardstock before overlapping a layer of Vellum cardstock.
Next I stamped the lillies image onto Whisper White cardstock twice. I used Stampin' Write markers to colour in the stamp - Sweet Sugarplum for the outline of the flower and Old Olive for the stem.
I cut out the flowers using my Paper Snips (I am really not a fan of fussy cutting but let me tell you, these were a dream to cut out!) I adhered one set of flowers straight onto the vellum and then popped up the second set directly over the top using Stampin' Dimensionals. This really has added some fabulous dimension to the flowers and I am really pleased with this effect.
To finish the card I stamped the sentiment Happy Birthday in Basic Gray using a stamp from the Sunshine Sayings stamp set. I cut around the sentiment and used glue dots to adhere it over the top of the stems.
I cut out the flowers using my Paper Snips (I am really not a fan of fussy cutting but let me tell you, these were a dream to cut out!) I adhered one set of flowers straight onto the vellum and then popped up the second set directly over the top using Stampin' Dimensionals. This really has added some fabulous dimension to the flowers and I am really pleased with this effect.
To finish the card I stamped the sentiment Happy Birthday in Basic Gray using a stamp from the Sunshine Sayings stamp set. I cut around the sentiment and used glue dots to adhere it over the top of the stems.


You can order everything I've used to make my card from my online shop today. Until the end of the month you can order 3 packs of selected DSP and get one pack 3!


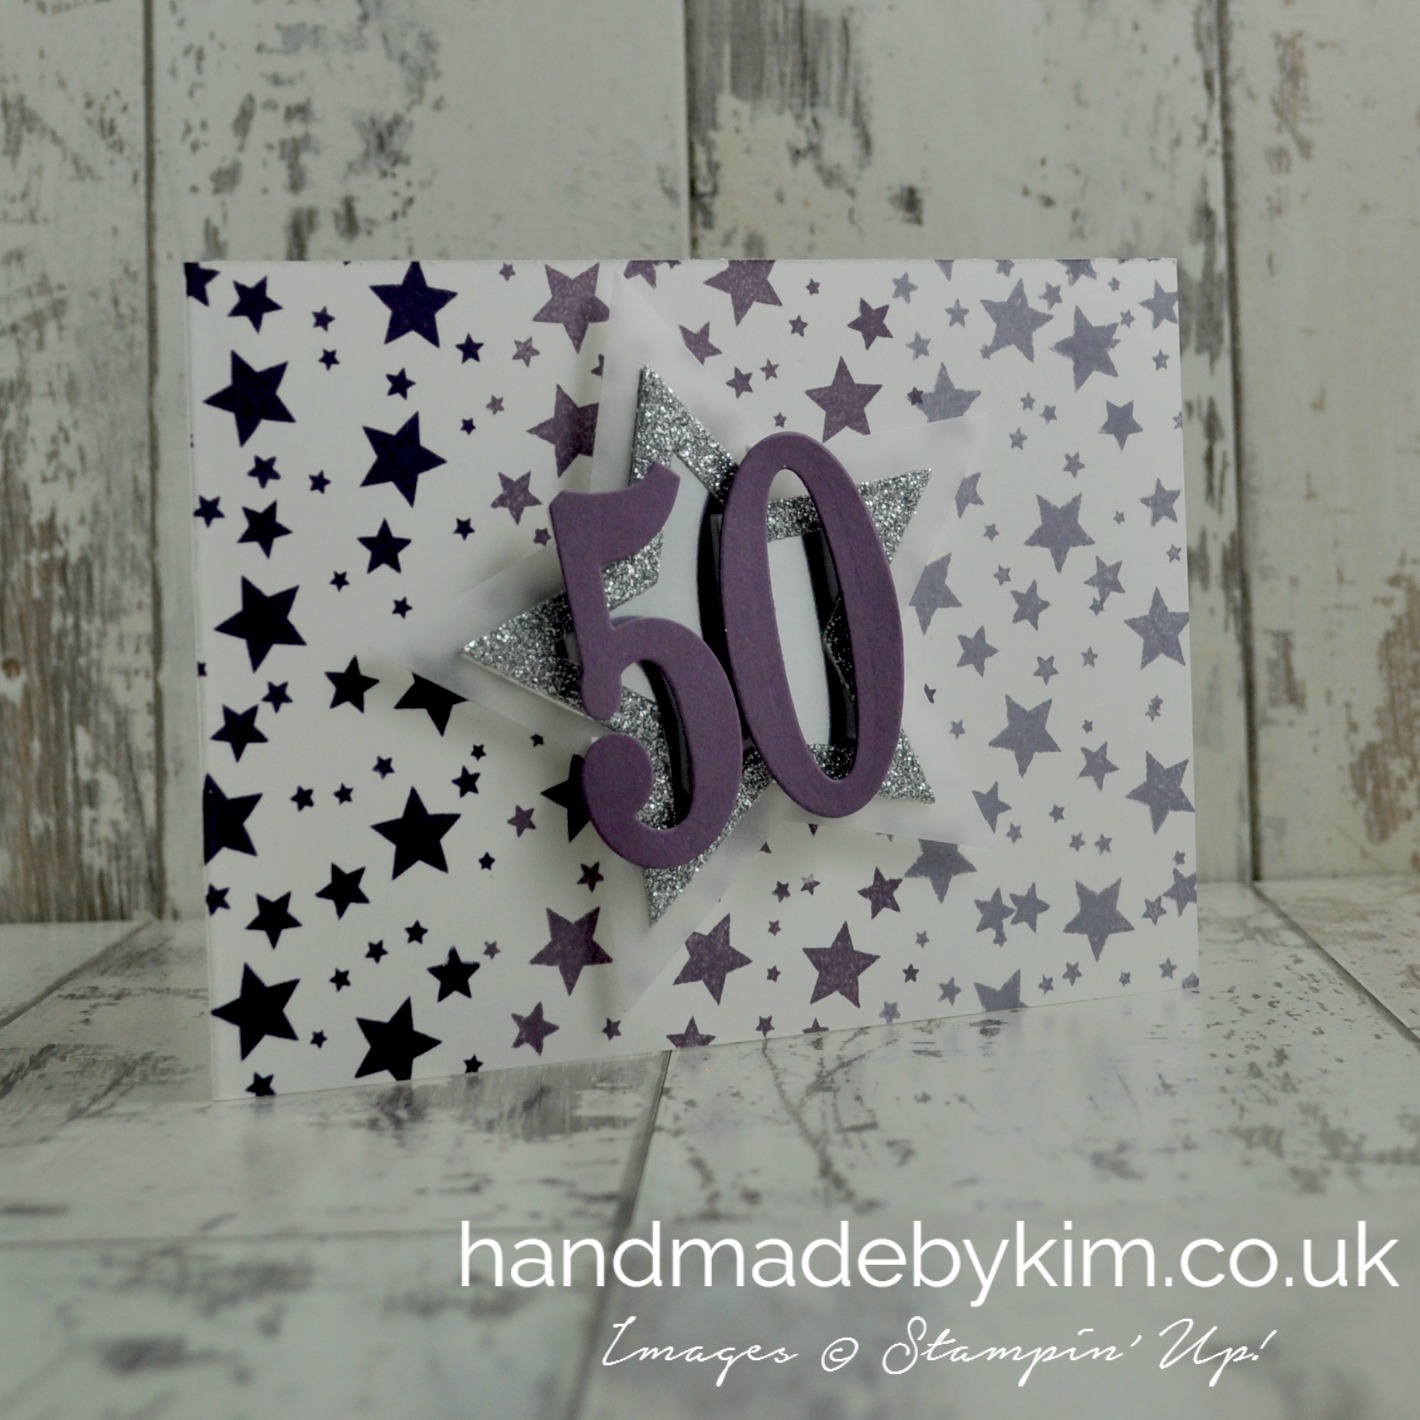
Just a quick card from me today. I made this card for a friend of mine called Bhavana (aka Baz) who turned 50 a few weeks ago.
Baz is a fellow Stampin' Up! demonstrator and part of the Pinkies team I belong to so I just had to make her a hand stamped handmade card. I hope she had a lovely week of celebrations!
I wanted to stamp my own background using the stars from the Perpetual Birthday Calendar stamp set and after several attempts I decided on this sideways ombre effect using Elegant Eggplant, Perfect Plum & Wisteria Wonder. I love this effect and can't wait to use it again!
I then die cut stars in Vellum, Silver Glimmer Paper and Silver Foil Sheet and layered them together before add the number 50 die cut from Perfect Plum cardstock using the Large Numbers Framelit Dies. I popped this up using Stampin' Dimensions, stamped Happy Birthday inside the card and my card was finished. I really hope Baz liked it!


Today I am off to the Village Hall in Croughton for the Pinkies Team Training Event. I can't wait to catch up with everyone and make some lovely things. We have a special guest joining us today too, Paula Gorry the UK Country Manager for Stampin' Up! How exciting!
When we all get together, we always make swaps. Usually we all make a card or 3D project using Stampin' Up! products, we would make enough for each person attending (we have 47 attending today). We then would spend 30 minutes or so swapping our makes with each other and talking about what each other has made. Its great as you get inspired with new ideas and techniques and we also then have samples of stamp sets or designer series papers that we might not own ourselves that we can show to our friends and customers.
For this event Michelle wanted us to try something different. What we had to do was put our name against stamp sets Michelle had chosen from the Spring Summer or Sale-a-Bration catalogues. There were 6 slots under each stamp set and I chose the Birthday Blooms stamp set. Our task was to make 6 swaps using our chosen stamp set and other Stampin' Up! current products of our choice. We then had 5 cards to swap with the others in the same group and one to keep for ourselves. I can't wait to see what everyone has made!

There are so many wonderful cards on Pinterest using this stamp set (click here to have a look) and I could have easily CASED one (copy and share everything) but I wanted to come up with something original.
Now I'm not the greatest colourer in (okay I know that's not a word!) and I definitely am not the best fussy cutter so I spent a couple of evenings in my craft room this weekend thinking of ways 'outside the box' on how to use this stamp set in a way that might not have been done before. By using just black and white in my project, this stamp set suddenly has a whole different look. What do you think?

This photograph really doesn't show just how sparkly the centre of the card is, so I'll describe to you how I made this section.
The oval is made up of three different layers. The bottom layer is vellum cardstock and I've used the clear Wink of Stella glitter pen to colour in the vellum for a sparkly but subtle finish. The next layer is an oval piece of window sheet with the flower stamped from the Birthday Blooms stamp set in black Staz On ink. I used my embossing buddy on the window sheet first so that the stamp didn't slip when it touched the window sheet. Stamping on the window sheet allows you to flip the image over to create a mirror image of the flower. The final layer was an oval border cut from basic black cardstock. I used two of the ovals in my big shot machine, to hold them in position I simply placed a post it note over the dies. I then used my clear wink of stella pen to give the border a glitterly finish.

If you want to check out what we are up to today, download the Periscope App on your smart phone or tablet and search for Michelle Last. Michelle is doing a live broadcast at 12:30pm!
Also, make sure you click here to subscribe to my blog updates as I'll be posting pictures from today including the five swaps I received.


Just For You.... Handmade Card created with Sale-a-Bration Freebies by Stampin' Up!
Saturday, January 16, 2016

I wanted to take the opportunity today to say hello and welcome to all my new subscribers! Thank you so much for subscribing, it means a lot to me and I hope you enjoy looking at the projects I make.
Today's project has been made using a free stamp set that I have earned during Sale-a-Bration.
For every £45 you spend during Sale-a-Bration you can choose one item from the Sale-a-Bration catalogue for FREE. Click here to browse the Sale-a-Bration catalogue
You can do so much with this stamp set but I wanted to show you how lovely it can be with this simple design in silver and white. I'll be working on a stepped up version of this card so keep and eye out for this on my blog !
I stamped the sentiment Just For You in Versa mark Ink and used Silver Embossing Power and my Heat Tool to give this shiny silver effect. I punched out some flowers from Vellum cardstock using one of the Itty Bitty Accent punches and added Rhinestones to the centre.
Have a great weekend!


Thank you for joining us on another Pinkies Blog Hop! We're showcasing lots of gorgeous
projects using products from the new Stampin' Up!® Spring/Summer Catalogue. Simply use the
buttons at the end of each post to keep hopping!
If you have arrived here from Sarah's blog, thanks for stopping by! Isn't Sarah's card so cute! I really hope you enjoy looking at the projects we have made!
Today's project is a stationery tin and set of notebooks I've made using the new Birthday Bouquet Designer Series Paper. Isn't it just gorgeous?

I made two sets as Christmas presents - one using Blushing Bride cardstock and the other using Pool Party cardstock. Both of these colours match this paper perfectly.
The Birthday Bouquet Designer Series Paper pack contains 12 sheets of 12" by 12" cardstock and each piece has a design on both sides (6 designs in total). The 6 different designed papers contain one or more of the following colours: Blushing Bride, Mint Macaron, Mossy Meadow, Old Olive, Pool Party, Soft Suede, Watermelon Wonder and Whisper White.
I think you could quite easily use Old Olive or Watermelon Wonder cardstock alongside this paper, or even Mint Macaron.

If you've been following my blog, you may have seen me using this tin before in my Typeset Specialty Series. Its a great tin for this sort of project as it can fit a number of items inside - this stationery set includes a shopping list, notepad (including post it notes), a mini notebook and a gold sparkly glitter nail file.

I've used my all-time favourite centre piece for the front of the tin and notepads which consists of a die cut butterfly from cardstock and vellum. I've used the medium sized die from the Butterflies Thinlits Dies for the front of the tin and the notebook and the small butterfly die from the Bold Butterfly Framelits Dies for the shopping list and mini notebook. I LOVE these dies, which is why you will find them in lots of my projects! The new Big Shot Die Brush on page 19 of the catalogue is perfect for popping out all of the little pieces from the butterflies! Its my new best friend.

I hope you enjoyed looking at my project today - make sure you leave a comment to let me know you stopped by!
Next up is Tracy and she has made a fabulous card for you today. Enjoying hopping and I hope to see you again next time.


Note pad and shopping list made using the Birthday Bouquet Designer Series Paper by Stampin' Up!
Saturday, January 2, 2016

Happy New Year!
With a new year always comes a new Stampin' Up! catalogue and the fabulous Sale-a-Bration promotion. Now what could be better way to start the new year than that?
You can start ordering from the 2016 Spring Summer catalogue from 5th January 2016 from my online shop AND for every £45 you spend, you can choose a free item from the Sale-a-Bration catalogue!
You can download a copy of both the Spring Summer catalogue and the Sale-a-Bration catalogue from my blog on 5th January. Make sure you click here to subscribe to my blog posts so you are notified when its available.

For now, I will leave you with a taster of this gorgeous new designer series paper - its called the Birthday Bouquet DSP and I LOVE it. I've used a whole pack up already. I found once I had started using it, it was very hard to stop!

I made these shopping lists and note pads as Christmas gifts. I love these spring colours so I used Blushing Bride cardstock and Pool Party cardstock to coordinate.
I used my favourite dies, the Butterflies Thinlit Dies and the Bold Butterfly Framelit Dies for the centre piece of each item of stationery. As you can see, the butterflies have 2 layers, the bottom layer is cardstock and the top layer is vellum.

Come back on Thursday 8th at 6pm to see more stationery made with this Designer Paper. I took this idea a few steps further and created a giftable stationery set based on the same design.
Why Thursday and why 6pm? Well, this Thursday the Pinkies are holding their Spring Summer Blog Hop and we will be showcasing projects made with new products from the Spring Summer catalogue.
If you don't know what a Blog Hop is, then make sure you stop by! If you can't wait until then, you can click here to see previous Pinkies Blog Hops.
If you don't know what a Blog Hop is, then make sure you stop by! If you can't wait until then, you can click here to see previous Pinkies Blog Hops.

Beautiful birds handmade wedding card using Stampin' Up! Bird Builder Punch
Wednesday, November 11, 2015

All I've been thinking since I've got back off holiday is Christmas. Christmas shopping. Christmas food. Christmas cards. And simply not having enough time to prepare. So I decided I needed a break. No, not another holiday! I just needed an hour in my craft room making a handmade card that wasn't Christmassey (yes, that's a word).
Okay, so I don't know anyone getting married, this year or next, but that doesn't mean I can't enjoy spending some time making a wedding card.

Sometimes, when I craft for fun, I just pull out some cardstock and DSP in colours that I love. I choose which colours to combine, or simply stick to a single colour theme. I then cut and score my card base and add a layer or two.... I then think about what stamp set I am going to use and what is going to be the main feature of the card. I've had the Bird Builder Punch for well over a year and I have never used it. Having prepared my base, I knew I wanted something white in the centre of the card, so I used the Shimmery White cardstock to punch out the birds and added a small sentiment using the For The New Two stamp set.

I hope you enjoyed this project today. I love crafting for fun, make sure you find the time to do this as well as crafting for specific occasions or workshops. Sometimes when the pressure is off, creativity comes along natually.
I would love to give this card away. Anyone who leaves a comment or subscribes to my blog will have a chance of winning this card. I will check back in a week and will pick someone randomly to send this card to.

Happy Wonderful Christmas - an alternative way of using the Wondrous Wreath Stamp Set
Wednesday, October 28, 2015

I love that last years Christmas set Wondrous Wreath Photopolymer stamp set and the Wonderful Wreath Framelit Dies have carried over to this years Autumn/Winter catalogue.
I was thinking about recreating last years Christmas card because I didn't get a chance to blog about it..... but before I knew it I got totally sidetracked thinking about how else could I use this set without using the main wreath stamp.

The result is that I've made a card using the berries stamp (top right in the picture above) from the Wondrous Wrearh set. I used the sentiment included in this stamp set 'Happy Wonderful Christmas' and then punched out 5 flowers from Vellum cardstock using the Itty Bitty Accents punches and then added some Rhinestones.
I really like this effect. You could definitely use this stamp for any occasion, not just for Christmas. It also gave me another reason to use my current favourite cardstock - Whisper White Thick Cardstock.


I just wanted to take this opportunity to say hello to all of my subscribers, new and old - whether you follow my blog through being a direct subscriber or through Bloglovin', Facebook, Twitter, Pinterest or Google+. If you are not a subscriber, it would make my day if you followed my blog - click here to receive email updates each time I post a new project or click on one of the following: Bloglovin',
Facebook, Twitter, Pinterest or Google+ if you want to follow me through these social media channels.
Some of my more recent subscribers may have come across my website from receiving a thank you note and free gift when buying retired Stampin' Up! products from me on eBay. If that's you - thank you and welcome!!
Everyone who bought a product from my online shop on eBay in the month of September received a version of the featured paper bag and thank you note and also a free gift containing at least 8 sheets of 6"x 6" DSP and some ribbon.
I love to share what I make so I thought it would be a good idea to provide all of my details and a little bit of information about Stampin' Up! and how to place an order on the note card inside the paper bag.
Thanks again to all of you who got in touch to let me know how much you liked my blog, how you liked by photos on eBay and how you were pleased with your free gift. You have no idea how much that meant to me. I hope that you enjoy looking at my projects and that they inspire you to craft and have fun!

Butterflies & Stripes - Handmade cards using the Floral Wings stamp set by Stampin' Up!
Monday, October 12, 2015

I had such a lovely time at our Quarterly Training yesterday. We made 5 amazing projects and I can't wait to take the inspiration I've gained from today and make some brand new projects.
I had to take some sample of work I had created so I took these cards and lots of other projects that are going to feature on my blog over the next few weeks,

I love the stripey paper in the DSP stacks. On this occasion, I didn't want to show a border of the cardstock underneath. I really like this effect so I might try it with some other DSP to see how it looks.

We're not all perfect (although I would like to be!) Sometimes things just don't go to plan. For example, on the card above my butterfly is not positioned in the centre. I didn't notice it at the time so when I did notice it, I was tempted to make the card from scratch again.

I hope you enjoyed my project today. Come back on Wednesday to see the Christmas Gift Box I've made.


So here it is, my brand new shiny series showcasing the gorgeous Timeless Elegance Designer Series Paper from Stampin' Up!. I have 7 different projects for you over the next 2 weeks and I really hope you enjoy them.
I LOVE this paper and I can honestly say that its the first paper that I've ever used up the entire pack . I normally hoard paper I love, I just can't seem to use it. It's like I am saving it all for a rainy day. Well this time I decided just to cut into it straight away. And since I decided that, I just kept using it and using it in my projects.
With all of my finished projects, I put them in my basket ready for photographing. Seeing them together made me realise that I had an opportunity to do another series.... so I added a few more projects so I had 7 in total - a few didn't make the cut but hey ho, we all know that when crafting things don't always look the way we envisaged them to. Some of the projects have been finished for a little while now and to be honest its been killing me having to patiently wait to show them to you.
I am really excited to show you today this gorgeous stationery tin I've made. Isn't it just fabulous?

Now I can't take credit for this gorgeous design, my upline Michelle Last created this as a project for our craft weekend in Birmingham way back in April. I've just taken Michelle's design and changed the colours to work with the Timeless Elegance Designer Series Paper. Click here to see Michelle's design.
I love Michelle's version and still have my pink tin in my craft room along with the yellow version we also made. Even though they would make great gifts, I just can't seem to be able to part with them - and I am glad as they gave me the inpsiration to make this tin.

You can buy these tins from Tinware Direct. I think its amazing how you can transform a metal tin with some beautfiul paper and a few accessories. I've used Black Glimmer Paper for the Banner & Flower and Basic Black Cardstock & Vellum Cardstock for the butterfly.

Still to come over the next two weeks I have a thank you card, a set of gift bags, a wedding card, the famous bag in a box, a congratulations card and to finish a pair of pillow boxes. Come back on Mondays, Wednesdays & Saturdays to see these projects or subscribe to by blog by clicking here.


Today's card features the new Whisper White Thick Cardstock. The Stampin' Up! standard Whisper White Cardstock is 216gsm. The Whisper White Thick Cardstock is much heavier at 270gsm. This makes it much stronger to hold embellishments and also allows you to keep the design simple with no layers, like I have shown in today's project.
I've created the background using the Watercolour Wash background stamp and Pool Party ink. I love the fact that you don't need to be an artist to have authentic looking brush strokes in your project.
I die cut a butterfly from Basic Gray Cardstock using the smallest die in the Butterflies Thinlits Dies set. I then die cut a butterfly from Vellum using the smallest butterfly in the Bold Butterfly Framelit Dies and layered this onto the butterfly in Basic Gray. I might try this using the Silver Foil Paper or Silver Glimmer Paper next time to give the card more sparkle.
I then adhered sequins, rhinestones and subtles candy dots to the background using the new Fine Tip Glue Pen which will be available in the Autumn/Winter catalogue that’s being released on 1st September.

On a 1cm strip of Whisper White I stamped the sentiment You're a true friend using the Endless Thanks stamp set. I then used the tripple banner punch to punch out the banner end. This stamp set is so versatile, there are so many combinations you make, take a look at the stamps included in the picture below.

I hope you have enjoyed this project today. Have a great weekend!
Subscribe to:
Posts (Atom)


Social Icons