
Showing posts with label Happy Birthday Card. Show all posts
Showing posts with label Happy Birthday Card. Show all posts

International Project Highlights Visual Blog Hop and sketch challenge entry into #GDP058
Wednesday, October 19, 2016


My name is Kim and I live in Somerset in the UK and I have made this birthday card using a sketch by Teneale Williams.
I've used the Blooms and Bliss designer series paper and the lillies from the Remarkable You stamp set.

I have stamped Happy Birthday in Sweet Sugarplum ink using the Stylized Birthday stamp for the inside of the card and also added an edge of torn designer series paper to the top and bottom of the Whisper White layer.

For the front of the card I have added a layer of designer series paper to fit the entire front of the card. I usually leave a border but I really like how this has come out. I then added a small layer of Sweet Sugarplum cardstock before overlapping a layer of Vellum cardstock.
Next I stamped the lillies image onto Whisper White cardstock twice. I used Stampin' Write markers to colour in the stamp - Sweet Sugarplum for the outline of the flower and Old Olive for the stem.
I cut out the flowers using my Paper Snips (I am really not a fan of fussy cutting but let me tell you, these were a dream to cut out!) I adhered one set of flowers straight onto the vellum and then popped up the second set directly over the top using Stampin' Dimensionals. This really has added some fabulous dimension to the flowers and I am really pleased with this effect.
To finish the card I stamped the sentiment Happy Birthday in Basic Gray using a stamp from the Sunshine Sayings stamp set. I cut around the sentiment and used glue dots to adhere it over the top of the stems.
I cut out the flowers using my Paper Snips (I am really not a fan of fussy cutting but let me tell you, these were a dream to cut out!) I adhered one set of flowers straight onto the vellum and then popped up the second set directly over the top using Stampin' Dimensionals. This really has added some fabulous dimension to the flowers and I am really pleased with this effect.
To finish the card I stamped the sentiment Happy Birthday in Basic Gray using a stamp from the Sunshine Sayings stamp set. I cut around the sentiment and used glue dots to adhere it over the top of the stems.


You can order everything I've used to make my card from my online shop today. Until the end of the month you can order 3 packs of selected DSP and get one pack 3!


World Card Making Day Stampin'! Up! Blog Hop feat. Jar of Love Stamp Set
Friday, September 30, 2016 Somerset, UK

It's so great to join together with so many demonstrators from all over the world to celebrate this crafty event, we have lots of amazing inspiration for you today and I hope you enjoy looking at our projects!
My name is Kim Price and I live in Somerset in the UK. You are currently visiting my blog Handmade by Kim. There is a list at the end of this post which will help you to move along from blog to blog so you see all 20 amazing projects.
I wonder how many different countries you will be visiting today?

My project today features the Jar of Love Photopolymer Stamp Set and the Everyday Jars Framelit Dies.

There are 37 stamps and 17 dies between these two sets - what a bargain! Did you know you can buy both of these sets as a bundle and save 10%!

To make my card, I have used the colour Pool Party for the card base and have chosen the same colour paper from the Subtles Designer Series Paper to coordinate.
I stamped the image of the jar in Crumb Cake ink onto Whisper White cardstock and used the matching framelit to die cut it using my Big Shot machine.
Next I stamped some stems onto the jar using Mint Macaron ink and then lightly sponged the lower half of the jar with Pool Party ink to look like water.
I then wrapped some Linen Thread around the neck of the jar and tied a small bow before fixing the jar to the card using Stampin' Dimensionals.

Next I did some 2-step stamping and stamped the flowers in 3 different colours using 2 shades that complimented each other - Peach (Calypso Coral ink and Flirty Flamingo ink), Yellow (So Saffron ink and Crushed Curry ink) and Pink (Blushing Bride ink and Sweet Sugarplum ink). I attached Stampin' Dimensionals to the back of each individual flower and arranged them at the top of the jar.
To complete the card I added the sentiment Happy Birthday using a stamp from the Balloon Builders stamp set that fit perfectly into the smallest die from Tags & Labels Framelit Dies.

You can order online 24/7 by visiting my online shop (found in the menu at the top of the screen), or you can contact me through any of my social media buttons.
You can subscribe to receive notifications of my new blog posts by clicking here, it would genuinley make my day to welcome new subscribers to my blog.
Thank you so much for visiting my blog today. Remember that you currently are at my blog - Kim Price, so make sure you check out the blog hop line up list below to see who is next in the list. Simply click on their name to visit their blog.
....... and don't forget to leave us a comment to let us know you stopped by - we just love to receive comments!
Have a great weekend and enjoy blog hopping!

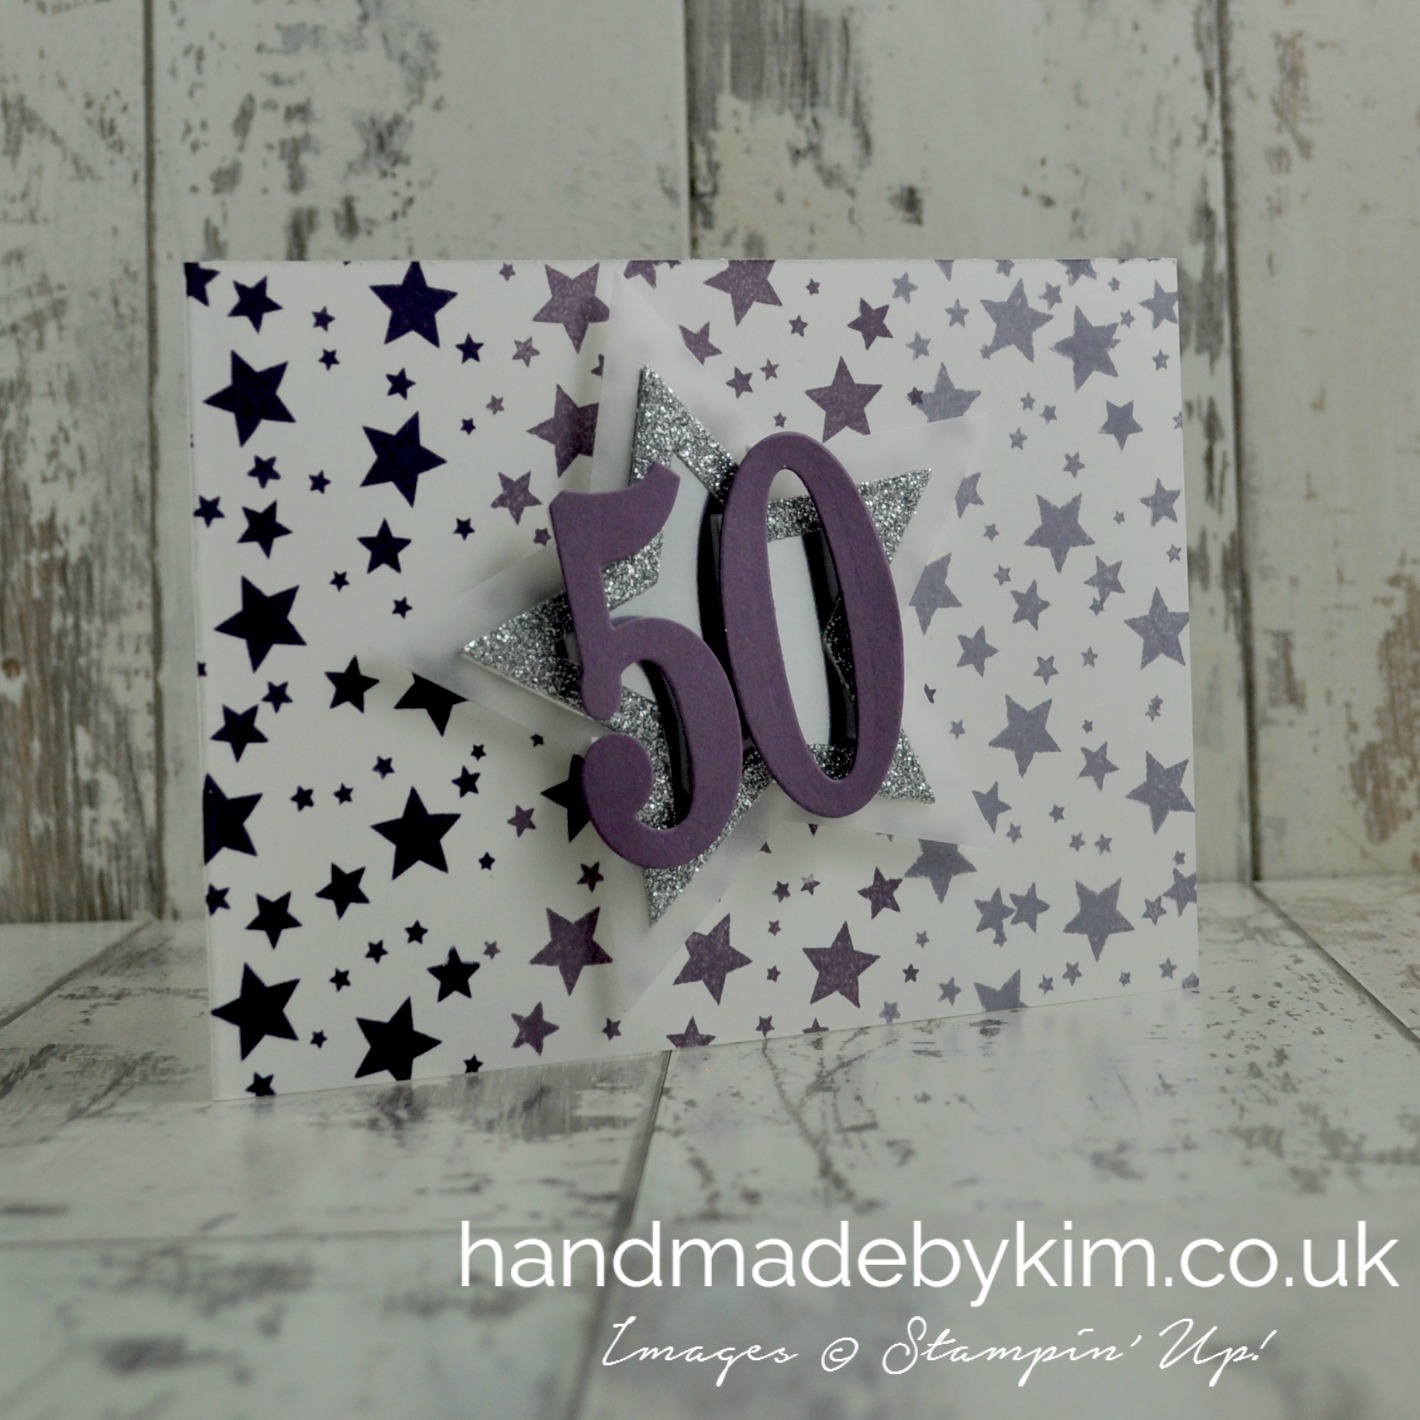
Just a quick card from me today. I made this card for a friend of mine called Bhavana (aka Baz) who turned 50 a few weeks ago.
Baz is a fellow Stampin' Up! demonstrator and part of the Pinkies team I belong to so I just had to make her a hand stamped handmade card. I hope she had a lovely week of celebrations!
I wanted to stamp my own background using the stars from the Perpetual Birthday Calendar stamp set and after several attempts I decided on this sideways ombre effect using Elegant Eggplant, Perfect Plum & Wisteria Wonder. I love this effect and can't wait to use it again!
I then die cut stars in Vellum, Silver Glimmer Paper and Silver Foil Sheet and layered them together before add the number 50 die cut from Perfect Plum cardstock using the Large Numbers Framelit Dies. I popped this up using Stampin' Dimensions, stamped Happy Birthday inside the card and my card was finished. I really hope Baz liked it!


International Blog Hop - A Bunch of Balloons Birthday Cards + Make & Take Kit Giveaway!
Tuesday, August 9, 2016 Somerset, UK

Today I am joining a group of demonstrators from around the world to show you ideas and inspiration using the latest Stampin' Up!® products that are available to purchase right now.
You may just be starting the blog hop here at my blog or you may have come from the person previous to me in the list. If you get off track at any time, the full lineup below will help you move along from blog to blog so you can see all of the projects.
If you live in the UK, I would love to assist you with purchasing Stampin' Up!® products or help you with any questions you may have.

My project today features the Balloon Builders photopolymer stamp set and the coordinating Balloon Bouquet punch.
There is so much inspiration on Pinterest, which is right where I looked when creating this project. My inspiration is taken from a number of cards - click here to see cards on Pinterest made using this stamp set.

This project was actually designed for a make and take that I created for a group of 40+ fellow demonstrators at a crafty weekend in Birmingham held by my upline Michelle Last. We had so much fun. There were 6 make and takes altogether and we had 3 hours to make them - time certainly flies when you are having fun!

I've made two versions of this card so you can see how versatile the design is by just using different colours and accessories.
I've used Pink Pirouette, Blushing Bride & Watermelon Wonder, a watercolour background using Pink Pirouette, coordinating Subtles Enamel Shapes and Cooper Metallic Thread. For the other card I have used Soft Sky, Pool Party and Island Indigo, a watercolour background using Soft Sky, coordinating Subtles Enamel Shapes and Silver Metallic Thread.

I hope you've enjoyed my project today. For a chance to win a free kit to make this card, please subscribe to receive my blog posts by clicking here. On 13th August I will randomly select two new subscribers plus one existing subscriber to receive the kit. All you will need is adhesive to put it all together!
Thank you so much for taking the time to hop around our blogs, there are so many amazing ideas and inspiration here that you don't want to miss a thing. Remember, my name is Kim Price and you are currently at my blog - Handmade by Kim. Make sure you check out the blog hop line up below to see who is next in the list and click on the link to visit their blog.
And don't forget to leave a comment, we just love to receive them!
Thank you so much for taking the time to hop around our blogs, there are so many amazing ideas and inspiration here that you don't want to miss a thing. Remember, my name is Kim Price and you are currently at my blog - Handmade by Kim. Make sure you check out the blog hop line up below to see who is next in the list and click on the link to visit their blog.
And don't forget to leave a comment, we just love to receive them!


I can't believe its the weekend already, the last few weeks have flown by! This weekend I will be in my craft room and I have a busy agenda. I'll be making cards for friends and family, creating cards and 3D projects to showcase here on my website and I will also be trying to come up with a unique and fun swap for a team training event that's coming up in 2 weeks time.
Do you ever struggle making cards for men? I certainly do, almost all of my stamp sets are geared towards females. There are a few male themed sets in the catalogue but I've not got round to ordering them yet. This card was designed with the male species in mind, the colours are quite grungy and there are no flowers or butterflies in sight.

As you know I like to keep my designs quite simple so I've layered designer series paper onto a Basic Gray base. I stamped Happy Birthday onto Very Vanilla cardstock using the Cottage Greetings stamp set and then used the Sprinkles On Top stamp set to stamp a row of candles.
There are some fab bargains in the Clearance Rack at moment, You can check these out by clicking on Clearance Rack in the top menu bar. I am putting an order on this weekend, so if you need anything, let me know. Have a great weekend!


I am really pleased that the Sheltering Tree stamp set has carried over to the new catalogue. I hadn't had a chance to use it yet and with a few family birthdays approaching I thought now would be the perfect opportunity. Its lovely to stamp with and I can't wait to use it again.
With winter long behind us now and summer on its way, I found it fitting to give these cards a spring
like feel.... This is what I love about this set, just a change of colours and your projects can look like any of the four seasons.
like feel.... This is what I love about this set, just a change of colours and your projects can look like any of the four seasons.

The additional stamps included are so cute. The broom, the swing and the bicycle are all fabulous and with the stamps being photopolymer you can easily see where to line up your stamp where you want them to be.

I ùsed my Scoring Stylus tool and Simply Scored scoring board to make a raised border. I also used various punches and layers to give the sentiments some dimension.

I hope you have enjoyed my card project today. Come back on Saturday for my next project using those scraps of DSP that you can't bear to throw away.


These cute cards are perfect to use either for a children's birthday party invitation.... or with a change of sentiment, they would make a lovely birthday card.

I love the vibrant colours in the Sweet Taffy Designer Series Paper so I matched my cardstock and ink to the paper using Melon Mambo and Bermuda Bay as the main colours.

I used the fab Zoo Babies stamp set for the image on the front and images inside the card. These animal stamps are so cute and I can't wait to use this set for another project.

The great news is that the Zoo Babies set is carrying over to the next catalogue but unfortunately the Sweet Taffy Designer Series paper is retiring and is sold out already.
You can place an order for anything that you need to stock up on before it sells out by clicking here or by visiting my online shop.


This card is my very first attempt of Punch Art. One of my good friends daughter was turning 2 a few weeks ago and she is obssessed with Peppa Pig, so, after a quick search on Pinterest, I knew exactly what I wanted to make.
I had a lot of fun making this card as Punch Art was a new technique and the style was very much out
of my comfort zone. I was absolutely thrilled to find out that Florence loved her card!
There isn't one single card that I based this on, to see the many different versions on Pinterest just click here.
The Envelope Punch Board is really handy for when you need an envelope to match and fit a handmade card.
Here is the custom envelope I made using the Subtles Designer Series Paper Stack.
Here is the custom envelope I made using the Subtles Designer Series Paper Stack.

I hope you have enjoyed this project. Make sure you check our the Retiring Products...there are some great bargains at the moment.


Another quick card and a tip from me today! If you are short on time, cut a beautiful piece of Designer Series Paper and matching cardstock, stamp your sentiment and punch it out. Put it all together with some adhesive and you have a quick but lovely card!

I sent this card to a relative a few weeks ago when I really didn't have time to design and make a birthday card. It only took me 5 minutes and whilst its very simple, I do think it looks lovely and I feel it's still more personal than a shop bought card.

The Painted Petals Designer Series Paper is still available for a few months in the Stampin' Up! Spring Summer Catalogue. It's almost too beautiful to cut...


Today I have a quick and easy project for you. This is a simple card using 3 layers to give this design a really striking effect.
I've used Island Indigo layered onto Basic Black Cardstock. The Island Indigo Cotton Ribbon is wrapped between these layers. I then added a final layer of Typeset Specialty Designer Series Paper before adding the sentiment.
I stamped Happy Birthday from the Label Love stamp set onto Naturals Ivory Cardstock in Black Staz On ink and then punched it out using the coordinating Artisan Label Punch.
I hope you've enjoyed my project today! I have another few birthday cards to share with you. I would love it if you could subscribe to my blog to keep up to date with my latest projects!


I wanted to find a style of card that my husband had never seen before to make as a surprise for his birthday. After searching Pinterest & Youtube, this is the result!
This style of this card is called a Slider card and I was surprised how easy it was to make!
I watched this Youtube video by US Stampin' Up! Demonstrator Dawn Griffth from Dawn's Stampin' Thoughts and followed it step by step.
For my design, I chose to use the Ivory Naturals cardstock with the Typeset Specialty Designer Series Paper. I stamped the image and sentiment in Black Staz On Ink.

The inside of the card is attached to the birthday cake so the cake moves upwards when you pull the ribbon!


Remember, you can earn this stamp set for FREE with any orders of £45 excluding P&P between now and 31st March 2015.

Subscribe to:
Posts (Atom)


Social Icons