
Showing posts with label Something to Say Stamp Set. Show all posts
Showing posts with label Something to Say Stamp Set. Show all posts


Another quick card and a tip from me today! If you are short on time, cut a beautiful piece of Designer Series Paper and matching cardstock, stamp your sentiment and punch it out. Put it all together with some adhesive and you have a quick but lovely card!

I sent this card to a relative a few weeks ago when I really didn't have time to design and make a birthday card. It only took me 5 minutes and whilst its very simple, I do think it looks lovely and I feel it's still more personal than a shop bought card.

The Painted Petals Designer Series Paper is still available for a few months in the Stampin' Up! Spring Summer Catalogue. It's almost too beautiful to cut...


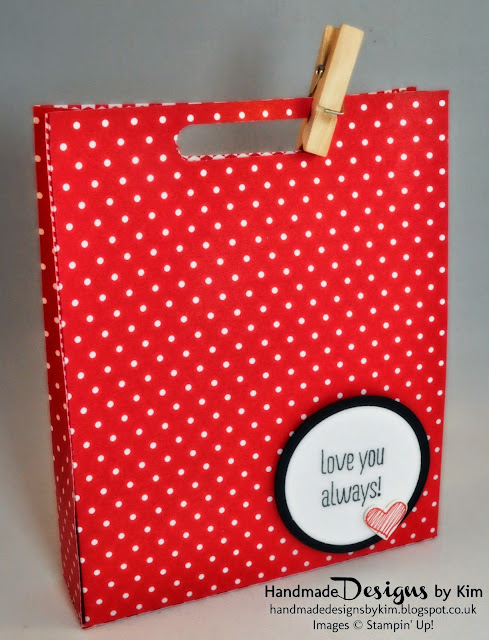

I am sharing with you today the Valentines Gift Bag and present I have bought for my husband for Valentines Day (here's hoping he doesn't check out my blog for the next few days).

I bought this cute little wooden star that says "I love you more than all the stars" from Sainsburys and needed to make a skinny gift bag to fit the star (any excuse to do some crafting!)


You can make this Gift Bag in less then 10 minutes by following these steps:
- Cut a piece of patterned paper measuring 12" by 6 1/2". I've used the polka dot pattern from the Brights Designer Series Paper Stack in Real Red
- On the long side, score at 4 1/2", 5 1/2", 10" and 11"
- Turn the paper once and score on the short side at 5 1/2 "
- Fold and burnish all scores lines
- Cut up to the 5 1/2" score line on the long side on all 4 score lines (4 1/2", 5 1/2", 10" and 11")
- Place your paper back in its orignal position and remove the far right hand bottom square (measuring 1" by 1")
- Using a good adhesive such as Sticky Strip or Fast Fuse, adhere the far right hand panel (measuring 5 1/2" by 1") to far left panel to form the gift bag sides
- Fold the flaps in at the bottom and use a good adhesive to keep these in place.
- Using any punch that suits your design, punch out a handle. I have used the Word Window Punch and have secured the top with a Clothespin.
- Stamp a sentiment onto Whisper White cardstock and punch this out using a punch of your choice. I have used the sentiment "I Love You Always" from the Something to Say stamp set and the 1 3/4" Circle Punch. I also punched out a 2" Circle in Basic Black to layer my sentiment.
- Finally, I stamped a small heart from the Something to Say stamp set in Real Red and punched it out using the Heart Punch from the Itty Bitty Accents Punches and adhered this to my sentiment.

Pinkies Stampin' Up! 2015 Spring Summer Catalogue Blog Hop! feat. Mini Treat Bag Thinlit Dies
Saturday, January 17, 2015

Thank you for joining us on another Pinkies Blog Hop! We're showcasing lots of gorgeous projects using products from the new Stampin' Up!® Spring/Summer Catalogue. Simply use the buttons at the end of each post to keep hopping!
If you have arrived here from Sarah's blog, thanks for stopping by! I really hope you enjoy looking at the projects we have made!
Have you had a chance to browse through the Spring/Summer Catalogue 2015 yet? There are so many fabulous products. I now have a supply of catalogues, so please do let me know if you would like me to post a copy to you.
My project today features 3 versions of the NEW Mini Treat Bag using the Thinlits™ Dies. This product is so versatile, I can think of so many uses for this!

This is my Wedding Favour Mini Treat Bag. I love the subtle colours in the Something Borrowed Designer Series Paper and thought I would keep the overall design quite clean and simple.

Here is my Retro Party Mini Treat Bag using the Painted Blooms Designer Series Paper. This would be perfect for an 80's party (or even a kids party). This version really utilises all of the dies included with the Mini Treat Bag Thinlits™ Dies. Whilst this is not my natural style, I loved putting these bold colours together, it was so much fun!

My final version is my Garden Party Mini Treat Bag. I have used the Painted Blooms Designer Series Paper again. I added a lovely bow made using the Bow Builder Punch to finish this off perfectly.

If you would like to order the Mini Treat Bag Thinlits™ Dies and a pack of Designer Series Paper for your project, please click on the pictures listed under supplies used to take you to my online shop or contact me through the Social Media Icons at the top and bottom of the page. Ordering these two items means you will qualify for FREE Sale-a-Bration products!
I can't wait to see what projects you have made, please post pictures on my facebook page or post a link to your blog under comments.
I would also love it if you would subscribe to my blog, so you can keep up to date with my latest creations!
Next we have Em's blog! Press next to continue hopping to see all of the fabulous Pinkies creations using products from the Spring/Summer catalogue.


Retro Party Mini Treat Bag supplies used


Garden Party Mini Treat Bag supplies used


Subscribe to:
Posts (Atom)


Social Icons