
Showing posts with label Brights DSP Stack. Show all posts
Showing posts with label Brights DSP Stack. Show all posts


Last weekend was the Pinkies annual trip to Birmingham where we spent 2 days crafting, chatting, eating and drinking - and swapping!
There were 35 of us going in total so I had to make the same number of swaps. Swaps are something us Stampin' Up! demonstrators like to do when we get together. You make 35 of the same thing and
you swap it in exchange for another handcrafted card front or 3D project. You end up with 35 unique projects to take home and use for inspiration or as samples at craft classes & events.I thought I would use the 2013-15 In Colour cardstock and ink to make the covered notebooks (the notebooks were such a bargain - 20p from Asda!).
The 2013-15 In Colours Pistachio Pudding, Strawberry Slush, Baked Brown Sugar, Crisp Cantaloupe & Coastal Cabana will be retiring soon and will be replaced with 5 brand new in colours. I do love some of these colours and will certainly miss Strawberry Slush & Coastal Cabana - but I can't wait to see what new colours Stampin' Up! come up with!!

I made 8 notebooks in each colour - that's 40 altogether. 35 to swap and 5 to keep for myself.
 |
| Coastal Cabana & Rich Razzleberry I stamped the I Love Lace background stamp set onto Whisper White cardstock for the front cover and sponged the edges of the paper for an aged/distressed look. |
 |
| Baked Brown Sugar & Blushing Bride I used the Four You stamp set to stamp the sentiment Hello onto Naturals Ivory cardstock and punched it out using the Decorative Label punch and sponged the edges using the same colour ink. |
 |
| Calypso Coral & Soft Sky I attached the sentiment to a piece of Designer Series paper to make a belly band to secure the notebook. |
 |
| Pistachio Pudding & Melon Mambo |
 |
| Strawberry Slush & Bermuda Bay |
Inside the notebook you can see that I've added a small pocket by adding a piece of Naturals White cardstock.

I had a great weekend and here is a picture of me (2nd from the right) and my table mates (left to right, Tracy, Baz, Yvonne & Sasha). We had such a great time and I am glad I got to know these lovely ladies over the weekend.

Here is a picture of the amazing swaps I received from my fellow Pinkies. What a talented bunch of ladies!

I love to make & receive swaps and take the opportunity to look through my swaps every month or so to help inspire me to use different colour combinations and techniques. From 4 events I have attended since I became an Independent Stampin' Up! Demonstrator, I now have over 125 swaps!
The Stampin' Up! regional event is fast approaching so next month I will be making 50 - 75 swaps to take with me. Subscribe to my blog to make sure you find out what swaps I've made & received!

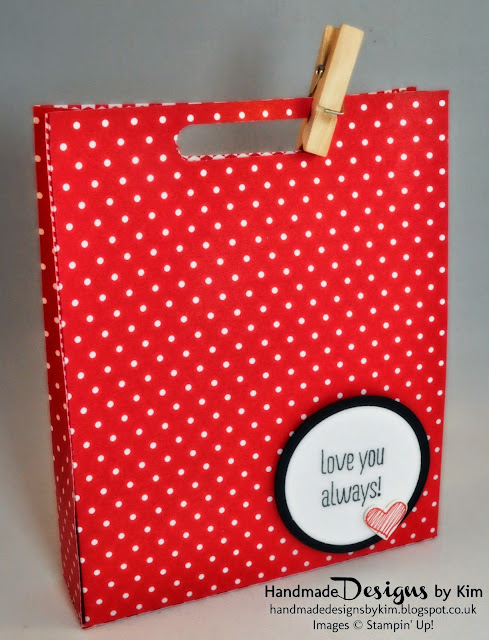

I am sharing with you today the Valentines Gift Bag and present I have bought for my husband for Valentines Day (here's hoping he doesn't check out my blog for the next few days).

I bought this cute little wooden star that says "I love you more than all the stars" from Sainsburys and needed to make a skinny gift bag to fit the star (any excuse to do some crafting!)


You can make this Gift Bag in less then 10 minutes by following these steps:
- Cut a piece of patterned paper measuring 12" by 6 1/2". I've used the polka dot pattern from the Brights Designer Series Paper Stack in Real Red
- On the long side, score at 4 1/2", 5 1/2", 10" and 11"
- Turn the paper once and score on the short side at 5 1/2 "
- Fold and burnish all scores lines
- Cut up to the 5 1/2" score line on the long side on all 4 score lines (4 1/2", 5 1/2", 10" and 11")
- Place your paper back in its orignal position and remove the far right hand bottom square (measuring 1" by 1")
- Using a good adhesive such as Sticky Strip or Fast Fuse, adhere the far right hand panel (measuring 5 1/2" by 1") to far left panel to form the gift bag sides
- Fold the flaps in at the bottom and use a good adhesive to keep these in place.
- Using any punch that suits your design, punch out a handle. I have used the Word Window Punch and have secured the top with a Clothespin.
- Stamp a sentiment onto Whisper White cardstock and punch this out using a punch of your choice. I have used the sentiment "I Love You Always" from the Something to Say stamp set and the 1 3/4" Circle Punch. I also punched out a 2" Circle in Basic Black to layer my sentiment.
- Finally, I stamped a small heart from the Something to Say stamp set in Real Red and punched it out using the Heart Punch from the Itty Bitty Accents Punches and adhered this to my sentiment.
Subscribe to:
Posts (Atom)


Social Icons