
Showing posts with label Gift Bag. Show all posts
Showing posts with label Gift Bag. Show all posts

Boho Indigo DSP Series - Treat Bag (remaking an old favourite!!)
Saturday, July 18, 2020 Bridgwater, UK

Today I am remaking an old favourite! It's my super simple Treat Bag / Gift Bag (whatever you want to call it!) made using just one sheet of 6" x 6" DSP
This is an original design of mine that I created way back in 2016. In fact, this design features in two of my most popular blog posts ever! It's been CASED many times too!

I've got lot's of other projects to show you too and very soon the new Mini Catalogue will be released featuring the new seasonal range! Are you ready for Christmas?


While this is the third time I've blogged about this little bag, I've made it countless times. Why don't you try making it? I promise you, you will find it so useful for gifting little treats or jewelry. They would be great for wedding favours too!
To make this bag you will need a piece of 6" x 6" piece of Designer Series Paper - for your first make it's probably easier to use a pattern that has no specific direction!
You will need to score the DSP as follows:
- Score at 1 3/8"
- Turn paper clockwise
- Score at 1 3/8" (only to the score line)
- Score at 2 3/4"
- Score at 4 1/8" (only to the score line)
- Score at 5 1/2"
Once you have done this, find your scissors, bone folder and some double sided tape and watch this old video of mine which shows you exactly how to make this style gift bag - just remember I'm using DSP and stamps that have now retired!
Well, that was easy wasn't it!
Did you know you can make 48 of these treat bags from the Boho Indigo Product Medley or Refill?

To decorate my Boho Indigo DSP treat bag, I've die cut a circle from the Stitched Shapes dies from Very Vanilla cardstock and added a Misty Moonlight scalloped circle behind it using the Layering Circles dies. I stamped a sentiment from the Forever Fern stamp set in Misty Moonlight ink onto the Very Vanilla stitched circle.
To embellish the bag, I've die cut the teeny flowers from the Well Written Dies and added a Basic Rhinestone in the centre. I've used the Seaside Spray Metallic Ribbon and the thread from the Flowers for Every Season Ribbon Combo Pack to secure the bag

I've been busy filming new videos in the last week and I'm excited to say that I have a thank you card video tutorial which will be coming out very soon!
I've also finished filming my Shadow Box Book Card Tutorial which is now available for you to purchase right here on my blog! Just click the banner below to find out more!

Floral Boutique Treat Bag Swap & My First YouTube Tutorial!
Saturday, February 18, 2017 Somerset, UK

Tomorrow I am attending an event that my upline Michelle Last has arranged for Stampin' Up! Demonstrators in her downline. I'm really looking forward to it as I've not see my good friends Baz and Sasha since November and I can't wait to have a catch up with them. Of course I am looking forward to seeing everyone else and also to do some much needed crafting!! Michelle designs the most beautiful projects and its really nice to sit back and make something that someone else has designed.

I made a treat bag in this style back in December and I had lots of lovely people comment on my blog and email me asking for a tutorial. I am pleased to say that I have finally plucked up the courage and made a YouTube tutorial - I hope you like it and please do let me know by liking it or subscribing to my channel.
I designed this treat bag myself, I think its quite unusual as it has a square base and curved sides. Its super quick to make and its the perfect size to hold a few treats. From one pack of 12" x 12" Designer Series Paper, you can make 48 of these bags!

To make this bag you need a 6" x 6" piece of Designer Series Paper and score as follows:
- Score at 1 3/8"
- Turn paper clockwise
- Score at 1 3/8" (only to the score line)
- Score at 2 3/4"
- Score at 4 1/8" (only to the score line)
- Score at 5 1/2"

You can click here to go to YouTube to watch my tutorial or you can click on the play button below.
To make this project you can buy the products I have used from my Online Shop which can be found in the menu bar at the top of the screen. All the products are listed below under labels - you can also find the product names and the product codes on my video as I use each product, please do contact me through my social media channels if you have any questions at all.


Christmas Treat Bags using 6" x 6" Candy Cane Lane Designer Series Paper by Stampin' Up!
Thursday, December 22, 2016 Somerset, UK

Time has gone by so quickly and unfortunately I never got a chance to make any handmade Christmas cards this year. It's such as shame as I had so much lovely product to use. Thankfully I managed to quickly whip up 21 of these ever so cute gift bags for my team and my colleagues at work. They are really quick to cut and build - but they take a little longer to embellish.
They contain a few chocolate Celebrations. We've already gone through quite a few boxes of Celebrations and other treats in the office so these gifts were more a token of my appreciation for all the team's hard work this year. I hope they liked receiving them!

I'm actually quite proud of these little treat bags, they are my first original design!! Its more than likely someone, somewhere in the world would have also made this shape bag but I certainly haven't seen them before.
The collage below shows the shape of the bag a little better. It's super simple to make and if anyone is interested, please make sure you leave a comment asking me to publish the instructions. If I get a good response, it might just tempt me to do my first YouTube video.
EDIT - Here is my tutorial (I'm using different DSP) where I show you how I made these treat bags!

Finally, I'd like to take this opportunity to wish you and your families a wonderful Christmas and New Year. I would also like to say thank you to all my followers and subscribers across all channels for following and supporting me for the past two and a half years. I am so pleased you found something, either on my blog or my social media pages - that you liked enough for you to subscribe or follow me - thank you!
Have a great time this Christmas everyone and stay safe x
p.s my broadband is only just up and running again so hopefully I'll be back to blogging regularly again the the New Year. Currently I have a speed of 3.5 mb, so wish me luck!

Happy Halloween - Stampin' Up! Halloween Treat Bags, Pumpkin Carving and my own little Halloween accessories Charlie & Bayley
Monday, October 31, 2016 Somerset, UK

I work as a Finance Manger and there are 23 of us in the Finance department, 10 of which are in my direct team and I have a further 8 indirect team members. Its such a lovely team and we all get on really well. We're currently planning Christmas activities such as Secret Santa, Christmas Jumper Fridays and a Christmas buffet lunch. We already have two nights out in December, I need to get shopping for some festive outfits!
Anyway, enough about Christmas and back to Halloween. On Friday evening after everyone had left, I left a little bag of Halloween treats on every desk. I hope it brings a smile to everyone's faces when they come into work on Monday morning. Naturally I had to make myself one - here it is on my desk. And yes, there are two 27" monitors on my desk!

I thought it would be nice to have a bit of fun so I asked the team to come up with some ideas on what we can do. Unfortunately we can't do full on fancy dress as we have visitors in the building but we are accessorising! I have some devils horns and a red glittery stake!
Some of the team are also bringing in Halloween themed bakes. I've made puff pastry bakewell tarts, they were meant to look like pumpkins, with flaked almonds for eyes and a nose - but the orange food die did not come out very well so they are not very orange.. I'm looking forward to seeing the cookies and cakes everyone is making! Definitely off the diet today!
We're also having a pumpkin carving competition - I am terrible at carving but I do like to participate, so here is my entry. I kept it simple and trust me, close up, its not very good. I messed up the top so it has no lid - lesson learned for next year. I really can't wait to see what everyone has made! They are sure to be much better than this.

I've made some prizes for 1st, 2nd and 3rd place using the Baker's Box Thinlit Dies but I forgot to photograph them. They were filled with chocolate treats and some popping candy. I used the Spider Web DSP from the Halloween Night Specialty DSP - the web pattern is silver embossed on black and this particular cardstock is thicker than the rest so it was perfect for this box.

Here are the treat bags I made - each has a tag which is hand stamped using the Spooky Fun stamp set and Ghoulish Grunge stamp set. I've stamped in Basic Black and Smoky Slate.

The Halloween Night Specialty DSP is so spooky this year. I love the combination of Basic Black, Basic Gray, Pumpkin Pie and Whisper White and the patterns are really great with lots of variety.

Inside each bag are some popping candy spider chocolates, chocolate eyeballs and pumpkins and jellies. Oh, and a few plastic creepy crawlies!

As promised, here are my own little Halloween accessories Charlie & Bayley. I love my cats and they are always close by when I am in my craft room. Charlie often jumps in my photo studio so I encouraged him to sit down and I took some photos of him with one of the treat bags. I swear he knows I am taking a picture - look at that pose and stare into the camera!
Bayley, bless her, wasn't as comfortable as Charlie and this is the best photo I managed to get of her, She looks a little grumpy but I think she might have been scared of my photography lamps.

Bayley tends to sleep on a bean bag the whole time I'm crafting. Charlie comes and goes and surprises me several times a day by jumping on my craft table. I have to quickly grab my pookey tools and scissors and make sure they are safely put away. Charlie likes to demand attention and I think he sometimes is annoyed when I am engrossed in my work and not him. Bayley is just happy to be snoozing and enjoys a cuddle every few hours.
I hope you have enjoyed my projects and photos today! Keep an eye on my blog over the next week for news and pictures from Onstage Local in Telford. I'm busy making swaps at the moment and getting excited about seeing sneek peeks and being able to pre order from the Spring Summer catalogue. Who knows, we might even get to see some Sale-a-Bration goodies too!

Please vote for my thank you card showcased in Kylie's international blog highlight!
Friday, March 11, 2016 Somerset, UK

Kylie is fantastic at bringing demonstrators and crafters together and showcasing their talents. Its lovely to see women supporting each other, especially seeing it was International Women's day earlier this week!
The theme of today's Blog Highlight is Thank You. Crafters from all over the world will be voting for their favourite projects showcased on Kylie's blog.

My project is a matching set of cards and gifts bags that I made to say thank you to attendees at my very first craft workshop. The gift bags contained an assortment of chocolates, needless to say they were gone in no time!
To see pictures from the workshop and the coordinating projects we made for Mothers Day, please click here!


I used Pink Pirouette, Blushing Bride and Rose Red ink and the Watercolour Wings, Watercolour Thank You and Timeless Textures stamp sets to stamp the design on the front of the card and the gift bags.
I even made coordinating tool kits - how cute are these?

Inside each thank you card was a gift tag numbered 1, 2, 3 or 4 made with the Number of Years stamp set, the Large Numbers Framelits Dies and the Ornate Tag Topper Punch.
I placed the four cards down on the four tables randomly and the guest who had number 1, won the Watercolour Wishes Card Kit! No-one walked away empty handed though, the other three guests all took home enough supplies to make 3 cards from the You're So Lovely Project Kit!

Please vote for me!
I hope you've enjoyed looking at my projects today! I would be so happy if you could vote for me by clicking here to visit Kylie's website.
To vote, all you need to do is click the heart symbol in the top right hand corner of the photo. You can place 5 votes in total and it would absolutely make my day if you choose my card as one of your top 5.
If my card receives enough votes to make it into the overall top 5, I will get a chance to take part in Kylie's international blog hop!


Tomorrow I am going to the Quarterly Training event my upline Michelle Last holds for her first 3 levels of her downline. There are 30 of us going altogether so I've made enough swaps for everyone plus a few extra. I can't wait to go, we are going to have 4 make and takes, some additional classes and time to catch up with each other and share crafting stories.
I try to make something different every time I make swaps. Click here to look at my past creations which include gift boxes, notebooks, party favours & card fronts.
This time I decided to make some gift bags to hold some yummy sweet treats. I looked through my DPS stacks and chose 8 coordinating colours - Pear Pizazz, Blushing Bride, Wisteria Wonder, Soft Sky & Pool Party (Subtles), Smokey Slate, Sahara Sand (Neutrals) & Lost Lagoon (In Colour 2014-16). While there are 4 different patterns in these stacks, I decided to use the diagonal striped pattern and the large polka dot pattern. I love these patterns, especially for Christmas!
I followed instructions from the Chic 'N' Scratch blog where Angie Juda posts video tutorials on how to make the bags.
I love the internet for inspiration - YouTube, Blogs, Pinterest, Twitter - its really helpful that demos share how they make gift boxes & bags. I often go to other demos sites for the measurements (why reinvent the wheel!) but I always come up with the design myself.
I have used the Holly Jolly Bundle which includes the Holly Jolly Greetings stamp set and the Christmas Greetings Thinlit Dies. I love the sentiments cut out with these dies.
Here are all 8 designs, I actually made 4 of each - 32 in total!
Pear Pizazz, Gold Glimmer Paper & Gold Satin Ribbon

Lost Lagoon, Silver Glimmer Paper & White Satin Ribbon

Blushing Bride, Gold Glimmer Paper & Gold Satin Ribbon

Wisteria Wonder, Silver Glimmer Paper & White Satin Ribbon

Soft Sky, Silver Glimmer Paper & Silver Satin Ribbon

Smokey Slate, Black Glimmer Paper & White Satin Ribbon

Sahara Sand, Gold glimmer Paper & Gold Satin Ribbon

Pool Party, Silver Glimmer Paper & Silver Satin Ribbon


Here are the tools & adhesives I used to make this project
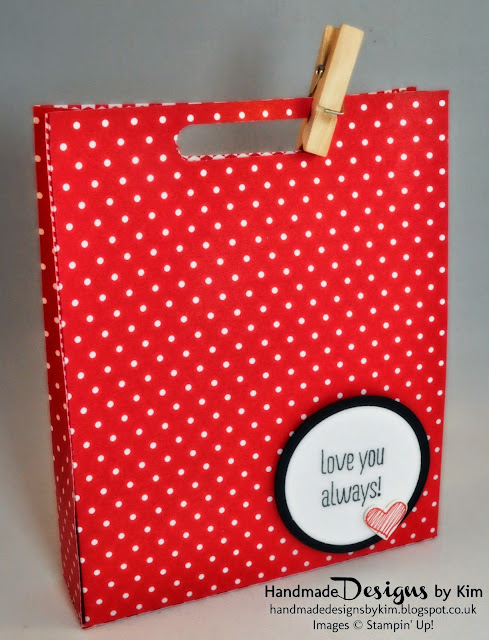

I am sharing with you today the Valentines Gift Bag and present I have bought for my husband for Valentines Day (here's hoping he doesn't check out my blog for the next few days).

I bought this cute little wooden star that says "I love you more than all the stars" from Sainsburys and needed to make a skinny gift bag to fit the star (any excuse to do some crafting!)


You can make this Gift Bag in less then 10 minutes by following these steps:
- Cut a piece of patterned paper measuring 12" by 6 1/2". I've used the polka dot pattern from the Brights Designer Series Paper Stack in Real Red
- On the long side, score at 4 1/2", 5 1/2", 10" and 11"
- Turn the paper once and score on the short side at 5 1/2 "
- Fold and burnish all scores lines
- Cut up to the 5 1/2" score line on the long side on all 4 score lines (4 1/2", 5 1/2", 10" and 11")
- Place your paper back in its orignal position and remove the far right hand bottom square (measuring 1" by 1")
- Using a good adhesive such as Sticky Strip or Fast Fuse, adhere the far right hand panel (measuring 5 1/2" by 1") to far left panel to form the gift bag sides
- Fold the flaps in at the bottom and use a good adhesive to keep these in place.
- Using any punch that suits your design, punch out a handle. I have used the Word Window Punch and have secured the top with a Clothespin.
- Stamp a sentiment onto Whisper White cardstock and punch this out using a punch of your choice. I have used the sentiment "I Love You Always" from the Something to Say stamp set and the 1 3/4" Circle Punch. I also punched out a 2" Circle in Basic Black to layer my sentiment.
- Finally, I stamped a small heart from the Something to Say stamp set in Real Red and punched it out using the Heart Punch from the Itty Bitty Accents Punches and adhered this to my sentiment.
Subscribe to:
Posts (Atom)


Social Icons